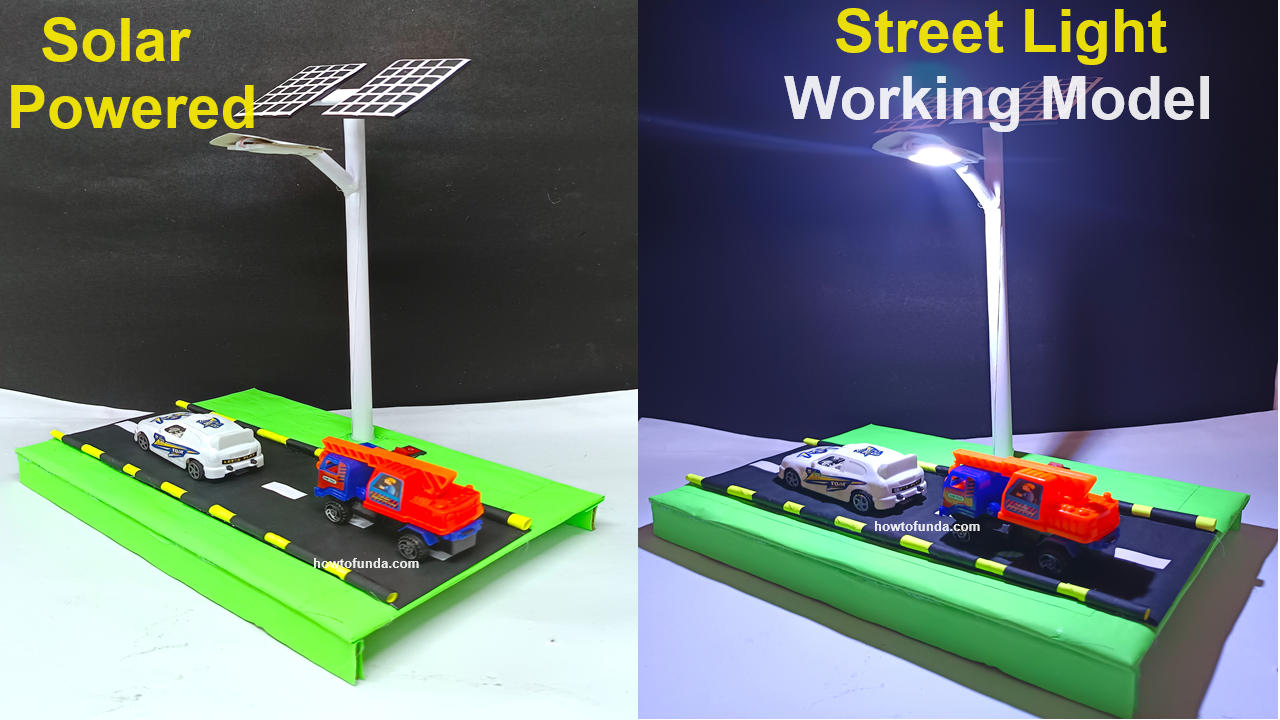
Creating a solar-powered street light working model for a science exhibition involves integrating a solar panel, LED light, and crafting the structure using paper and cardboard.
Here’s a detailed step-by-step guide to help you build your model:

Materials Needed
- Small solar panel (suitable for powering an LED)
- LED light
- Rechargeable battery (compatible with the solar panel and LED)
- Charge controller (optional, for better efficiency)
- Wires and connectors
- Switch (optional)
- Cardboard
- Color paper
- Glue
- Scissors
- Markers or paint
- Small toy vehicles or materials to create artificial vehicles
Step-by-Step Video Instructions
1. Base and Road Structure
- Base:
- Cut a large piece of cardboard to serve as the base of your model. Ensure it’s sturdy enough to support all the components.
- Road:
- Cut and attach black or grey color paper onto the base to create a road. Use white paint or markers to draw lane lines and road markings.
2. Street Light Structure
- Pole:
- Cut a rectangular piece of cardboard and roll it into a tube to form the pole of the street light. Secure it with glue.
- Cover the pole with grey color paper to give it a metallic look.
- Lamp Head:
- Create a small box or use a cut-out piece of cardboard to form the lamp head. Cover it with grey or black paper.
- Attach the LED light inside the lamp head, making sure it faces downward.
3. Solar Panel Setup
- Mounting:
- Attach the small solar panel to the top of the street light pole or on a separate cardboard structure nearby to simulate a solar panel mount.
- Ensure the solar panel is angled correctly to mimic real-world solar panel setups.
4. Electrical Connections
- Connecting the Solar Panel:
- Connect the solar panel to the rechargeable battery. Use a charge controller if available to ensure efficient charging.
- Connect the battery to the LED light. Optionally, you can add a switch between the battery and the LED for easy control.
- Wiring:
- Secure the wires along the pole using tape or glue. Ensure all connections are secure and insulated.
5. Integration and Final Touches
- Assembly:
- Attach the street light pole to the base, ensuring it stands upright.
- Hide the battery and any excess wires within the base or behind other structures to maintain a clean look.
- Decorations:
- Add small toy vehicles or create artificial vehicles using cardboard and color paper. Place them on the road to enhance the model’s realism.
- Decorate the base with additional elements like trees, buildings, or pedestrian pathways using cardboard and color paper.
Testing and Functionality
- Solar Charging:
- Place the model under sunlight or a strong artificial light source to charge the battery via the solar panel.
- LED Light:
- Once charged, turn on the LED light (if a switch is installed) to demonstrate the street light functioning using solar power.
- Display:
- Showcase the model, explaining how the solar panel captures sunlight, converts it into electrical energy, and stores it in the battery to power the LED street light.
By following these steps, you’ll create a working model of a solar-powered street light that effectively demonstrates the use of solar energy to power street lighting, complete with a realistic street and surrounding elements.