Introduction
Good morning everyone.
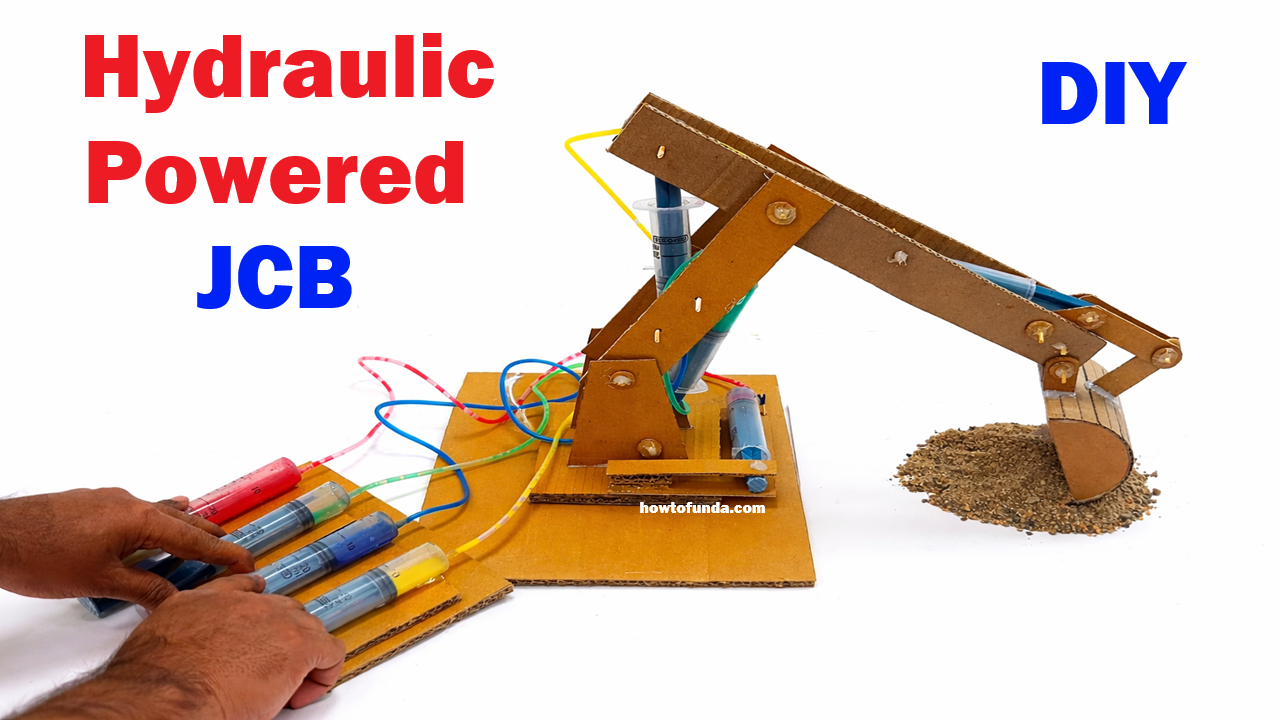
Today I am going to explain my DIY science project on “Hydraulic Powered JCB Working Model.” This working model is made using cardboard, syringes, plastic pipes, and water. It demonstrates the working principle of hydraulics used in real JCB machines and excavators.

Hydraulic machines are widely used in construction work for digging, lifting, and moving heavy materials. This project helps students understand how hydraulic pressure works and how heavy objects can be moved with less effort.
The model is simple, creative, and very useful for science exhibitions and STEM learning.
Principle of the Project
This project works on Pascal’s Law.
According to Pascal’s Law:
“When pressure is applied to a confined liquid, the pressure is transmitted equally in all directions.”
In this model, water inside the syringes transfers pressure through plastic tubes. When one syringe is pushed, the connected syringe moves, causing the JCB arm and bucket to move.
This hydraulic mechanism helps lift and dig objects easily.
Materials Required
You will need the following materials:
- Cardboard sheets
- Syringes (4 to 6)
- Plastic pipes/tubes
- Water
- Glue gun or Fevicol
- Cutter or scissors
- Wooden sticks
- Nuts and bolts or pins
- Paint and colors
- Scale and pencil
How To Make the Hydraulic JCB Model
Step 1 – Prepare the Base
Take a thick cardboard sheet and cut it into a rectangular base. This will support the entire JCB structure.
Step 2 – Make the JCB Arm
Cut long cardboard strips and make the JCB arm structure. Join the parts using bolts or sticks so that the arm can move freely.
Step 3 – Create the Bucket
Use cardboard pieces to make the digging bucket at the front of the arm. Fix it properly with joints.
Step 4 – Attach Hydraulic Syringes
Fix syringes at different joints:
- One syringe for lifting the main arm
- One syringe for moving the second arm
- One syringe for controlling the bucket
Connect the syringes using plastic tubes filled with water.
Step 5 – Fill Water in Tubes
Fill water carefully inside the syringes and tubes. Remove air bubbles for smooth hydraulic movement.
Step 6 – Connect Control Syringes
Attach control syringes outside the model. These syringes will be pressed by hand to control the JCB movements.
Step 7 – Decorate the Model
Paint the JCB and decorate the base to make it attractive for exhibitions.
Working of the Hydraulic JCB
- When the control syringe is pushed, water pressure moves through the tube.
- The connected syringe expands or contracts.
- This movement lifts or lowers the JCB arm.
- The bucket can also move for digging and lifting small objects.
This demonstrates how real hydraulic excavators work.
Scientific Concepts Used
This project explains:
- Pascal’s Law
- Hydraulic pressure
- Force transmission
- Mechanical movement
- Fluid mechanics
Real-Life Applications
Hydraulic systems are used in:
- JCB machines
- Excavators
- Cranes
- Car brakes
- Hydraulic lifts
- Bulldozers
- Industrial machines
These machines can perform heavy work using hydraulic power.
Advantages of Hydraulic Systems
- Requires less effort
- Lifts heavy loads easily
- Smooth and efficient operation
- Powerful movement
- Easy control mechanism
Educational Importance
This project helps students:
- Understand hydraulic technology
- Learn scientific principles practically
- Improve creativity and engineering skills
- Develop problem-solving abilities
It combines science, engineering, and DIY creativity in one model.
Conclusion
In conclusion, this Hydraulic Powered JCB Working Model is an educational and creative DIY science project that demonstrates the working principle of hydraulics using simple materials like cardboard and syringes.
The model helps students understand how pressure in liquids can be used to perform heavy mechanical work. It also explains the real-life use of hydraulic systems in construction and industries.
This project is simple, low-cost, and highly effective for school science exhibitions and STEM learning.