
Here’s how to create a Trigonometry Park Working Model, a creative and interactive representation of all major trigonometric concepts, using cardboard, color paper, push pins, and chopsticks.
Concept:
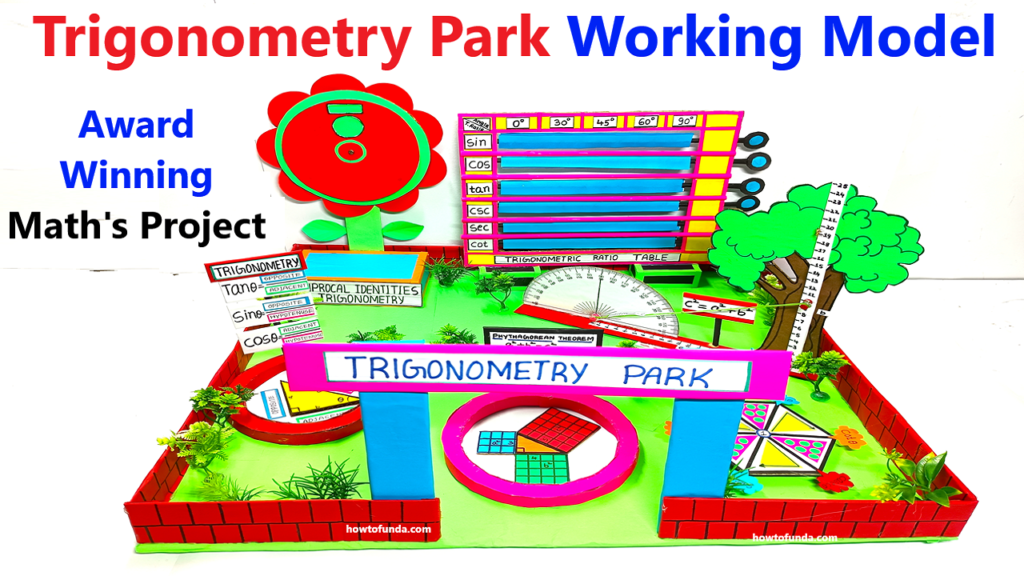
The Trigonometry Park is designed as a fun and educational space where different elements of the park (like trees, swings, slides, pathways, and observation decks) represent key trigonometric concepts such as ratios, identities, unit circle, and graphs.
Materials Needed:
- Cardboard: For the park base and structures.
- Colored Paper: For decoration and adding trigonometric labels.
- Push Pins: To create interactive and rotating parts.
- Chopsticks: For supporting rotating mechanisms and as vertical poles for structures.
- Glue/Tape: To assemble the pieces.
- Markers/Pens: For labeling and writing formulas or values.
- Ruler, Compass, Protractor: For drawing accurate shapes and angles.
Step-by-Step Instructions:
1. Create the Base (Park Layout):
- Cut a large piece of cardboard (e.g., 18×18 inches) as the base.
- Divide it into sections, each representing a different trigonometric concept (ratios, unit circle, identities, graphs, etc.).
- Cover the base with green paper to resemble grass and add pathways with brown paper.
2. Build Key Trigonometric Elements:
A. Right Triangle for Ratios (Main Attraction):
- Cut a large right triangle from cardboard.
- Use colored paper to create the squares for a2a^2a2, b2b^2b2, and c2c^2c2.
- Label the triangle with the trigonometric ratios:
- Opposite/Adjacent: tanθ\tan \thetatanθ
- Opposite/Hypotenuse: sinθ\sin \thetasinθ
- Adjacent/Hypotenuse: cosθ\cos \thetacosθ
- Use a push pin to attach a small rotating protractor template at the right angle, allowing users to measure and change θ\thetaθ.
B. Unit Circle (Observation Deck):
- Cut a circular disk from cardboard (approx. 6 inches in diameter).
- Divide the circle into quadrants and mark key angles (0∘0^\circ0∘, 30∘30^\circ30∘, 45∘45^\circ45∘, 60∘60^\circ60∘, 90∘90^\circ90∘, etc.).
- Label (sinθ,cosθ)(\sin \theta, \cos \theta)(sinθ,cosθ) coordinates at each angle.
- Attach the circle to a chopstick pole in the park’s center using a push pin, allowing it to spin.
C. Swing for Trigonometric Graphs:
- Create a swing structure using chopsticks as vertical poles and cardboard as the base of the swing.
- On the swing, display the graphs of sinx\sin xsinx, cosx\cos xcosx, and tanx\tan xtanx, drawn on small strips of paper.
- Attach the swing seat using strings or strips, making it interactive.
D. Slide for Trigonometric Identities:
- Build a slide using a sloped piece of cardboard.
- Write key identities along the slide:
- sin2θ+cos2θ=1\sin^2\theta + \cos^2\theta = 1sin2θ+cos2θ=1
- 1+tan2θ=sec2θ1 + \tan^2\theta = \sec^2\theta1+tan2θ=sec2θ
- 1+cot2θ=csc2θ1 + \cot^2\theta = \csc^2\theta1+cot2θ=csc2θ
- Add a small figure at the top of the slide to represent “proofs” sliding down into “conclusions.”
E. Ferris Wheel for Complementary Angles:
- Cut a circular Ferris wheel from cardboard.
- Divide it into 4–6 sections, each displaying complementary angle formulas, such as:
- sin(90∘−θ)=cosθ\sin (90^\circ – \theta) = \cos \thetasin(90∘−θ)=cosθ
- cos(90∘−θ)=sinθ\cos (90^\circ – \theta) = \sin \thetacos(90∘−θ)=sinθ
- Attach the Ferris wheel to a chopstick pole with a push pin for smooth rotation.
3. Add Details and Decorations:
- Pathways: Use brown paper for pathways connecting all structures, representing the interconnectedness of trigonometric concepts.
- Trees and Benches: Create trees from rolled green paper and benches from small cardboard pieces for aesthetic appeal.
- Labels and Signs: Add signs like “Ratio Corner,” “Identity Slide,” or “Unit Circle Deck” to guide viewers through the park.