
How to make the heart working model science project for exhibition – diy – simple and easy using cardboard and LED lights
#heartworkingmodel #scienceexhibition #sciencemodel #scienceproject #craftpiller #workingmodel #workingproject #science #sciencefair
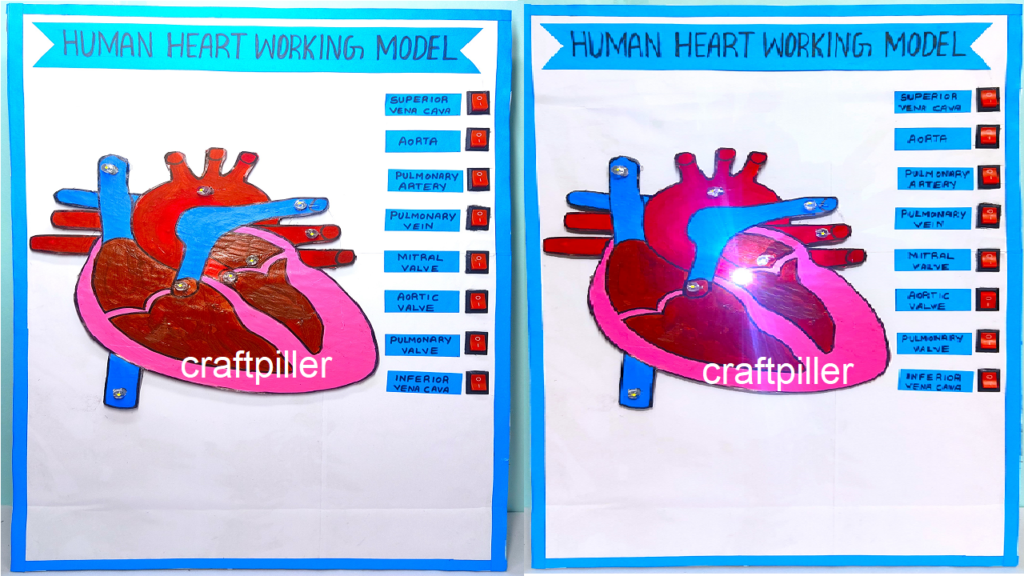
Creating a working model of the heart using LED lights and switches can be an engaging and educational project to demonstrate its various parts and functions.
Here’s a simplified guide on how to make it:
Materials Needed:
- Cardboard or foam board (for the base)
- Red, blue, and yellow LED lights (representing oxygenated blood, deoxygenated blood, and electrical signals)
- Resistors (to limit the current to the LEDs)
- Wires
- Battery or power source
- Switches (to simulate heart valves)
- Marker or pen (for labeling)
- Optional: Cardstock or colored paper (for additional details)
Step by Step Video Instructions:
- Prepare the Base:
- Cut out a large piece of cardboard or foam board to serve as the base of your heart model. This will provide stability and support for the components.
- Create the Heart Chambers:
- Draw and cut out shapes representing the four chambers of the heart: two atria (upper chambers) and two ventricles (lower chambers).
- Use red colored paper or paint to represent oxygenated blood and blue colored paper or paint to represent deoxygenated blood.
- Attach LED Lights:
- Place LED lights inside each chamber to represent the flow of blood. Use red LEDs for oxygenated blood and blue LEDs for deoxygenated blood.
- Connect the LEDs to the battery or power source through resistors to limit the current and prevent damage to the LEDs.
- Add Switches for Valves:
- Attach switches to simulate heart valves between the chambers. Use yellow LEDs to represent electrical signals traveling through the heart.
- When the switch is closed, it completes the circuit and allows the electrical signal (yellow LED) to pass through, simulating the opening of a heart valve.
- Label the Parts:
- Use a marker or pen to label each chamber and valve of the heart model. This will help viewers understand the different parts and functions of the heart.
- Assemble and Test:
- Once all components are in place, assemble the heart model on the base and test each switch to ensure that the LEDs light up and simulate the flow of blood and electrical signals correctly.
By creating a working model of the heart using LED lights and switches, you can visually demonstrate its various parts and functions in an interactive and engaging way. It’s a great project for learning about anatomy, physiology, and cardiovascular health.