In this post we write about making of earth rotation working model – diy – inspire award science project
Earth rotation refers to the spinning motion of the Earth around its own axis, an imaginary line that runs from the North Pole to the South Pole.
This rotation is responsible for the day and night cycle that occurs on Earth.
Key points of earth rotation
- Axis of Rotation:
- Earth rotates around an imaginary axis that passes through the North and South Poles. This axis is tilted relative to its orbit around the Sun.
- Direction of Rotation:
- Earth rotates from west to east, meaning that an observer on the surface of the Earth would see the Sun moving across the sky from east to west.
- Rotation Period:
- Earth takes approximately 24 hours to complete one full rotation. This period is known as a solar day. It’s the reason we have day and night.
- Effects of Rotation:
- Day and Night: As Earth rotates, different parts of the planet are exposed to sunlight, creating day and night. The side facing the Sun experiences daylight, while the opposite side is in darkness.
- Coriolis Effect: Earth’s rotation influences the movement of air masses and ocean currents, creating the Coriolis effect, which causes moving objects to be deflected to the right in the Northern Hemisphere and to the left in the Southern Hemisphere.
- Tilted Axis and Seasons:
- Earth’s axis is tilted at an angle of approximately 23.5 degrees relative to its orbital plane. This tilt, combined with its orbit around the Sun, leads to the changing seasons.
- Equator and Rotation Speed:
- The rotational speed is highest at the equator and decreases as one moves toward the poles. This difference in rotational speed contributes to atmospheric and oceanic circulation patterns.
- Implications for Space Exploration:
- Earth’s rotation affects space launches. Rockets are often launched eastward to take advantage of the planet’s rotational speed, gaining extra velocity from Earth’s rotation.
- Sidereal Day vs. Solar Day:
- A sidereal day is the time it takes for Earth to complete one full rotation relative to a distant star. It is slightly shorter than a solar day, which is the time it takes for the Sun to return to the same position in the sky.
Making of Earth rotation working model
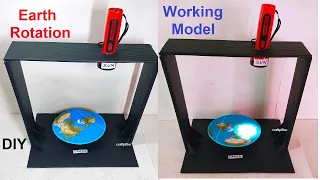
Creating an Earth rotation working model using a torch as the sunlight and a cardboard circle to represent the Earth is an excellent way to understand the phenomenon of day and night caused by the rotation of the Earth.

Here’s a step-by-step guide to help you build your model:
Materials needed:
- A torch or flashlight
- Cardboard or a sturdy base material
- A large circular cardboard piece to represent the Earth
- A long stick or wooden dowel
- Glue or tape
- Marker pen
- Optional: decorations, such as paint or stickers, to represent continents and oceans on the cardboard Earth
Instructions:
- Prepare the base:
- Take the cardboard and cut it into a suitable size and shape to act as the base for your model. It should be large enough to hold the cardboard Earth and allow room for the torch placement.
- Create the Earth:
- Take the large circular cardboard piece and decorate it to represent the Earth. You can use a marker pen to draw the continents and oceans on the Earth’s surface.
- If you like, you can also paint the Earth or use stickers to represent different landforms and geographical features.
- Attach the Earth to a stick:
- Take the long stick or wooden dowel and attach it to the back of the cardboard Earth using glue or tape. Ensure the stick is securely attached at the center of the Earth, so it can act as the axis of rotation.
- Position the torch:
- Place the torch or flashlight on top of the base, aiming downward towards the cardboard Earth. The torch represents the sunlight coming from the Sun.
- Show the rotation:
- Turn on the torch to simulate the sunlight.
- Rotate the Earth (cardboard circle) slowly around the stick (axis) to demonstrate the rotation. As you rotate the Earth, observe how different parts of the Earth experience daylight and darkness, resulting in day and night.
- Explanation:
- Use this model as a visual aid to explain the Earth’s rotation and its impact on day and night. You can cover the following key points:
- The Earth rotates on its axis, an imaginary line passing through its North and South Poles.
- As the Earth rotates, different parts of the Earth face towards the Sun, experiencing daylight, while other parts face away from the Sun, experiencing darkness (night).
- The Earth completes one full rotation in approximately 24 hours, resulting in the cycle of day and night.
- Use this model as a visual aid to explain the Earth’s rotation and its impact on day and night. You can cover the following key points:
- Optional decorations:
- To enhance the model’s visual appeal and educational value, you can add labels for the North and South Poles, the equator, and the continents.
Remember to demonstrate the rotation slowly and allow your audience to observe how the Earth’s rotation affects daylight and darkness. This model is a simple yet effective way to illustrate the Earth’s rotation and its role in the occurrence of day and night.
#earthrotation #workingmodel #diy #scienceproject #craftpiller #solarsystem #scienceexhibition #sciencemodel #sstproject #inspireaward #inspireawardproject