
1. Introduction
Day and night are natural phenomena that occur because of the rotation of the Earth on its axis.
The Earth is a planet that continuously rotates around an imaginary line called its axis. It takes approximately 24 hours to complete one rotation.
The half of the Earth facing the Sun receives sunlight and experiences daytime. The opposite half, which does not receive direct sunlight, experiences nighttime.
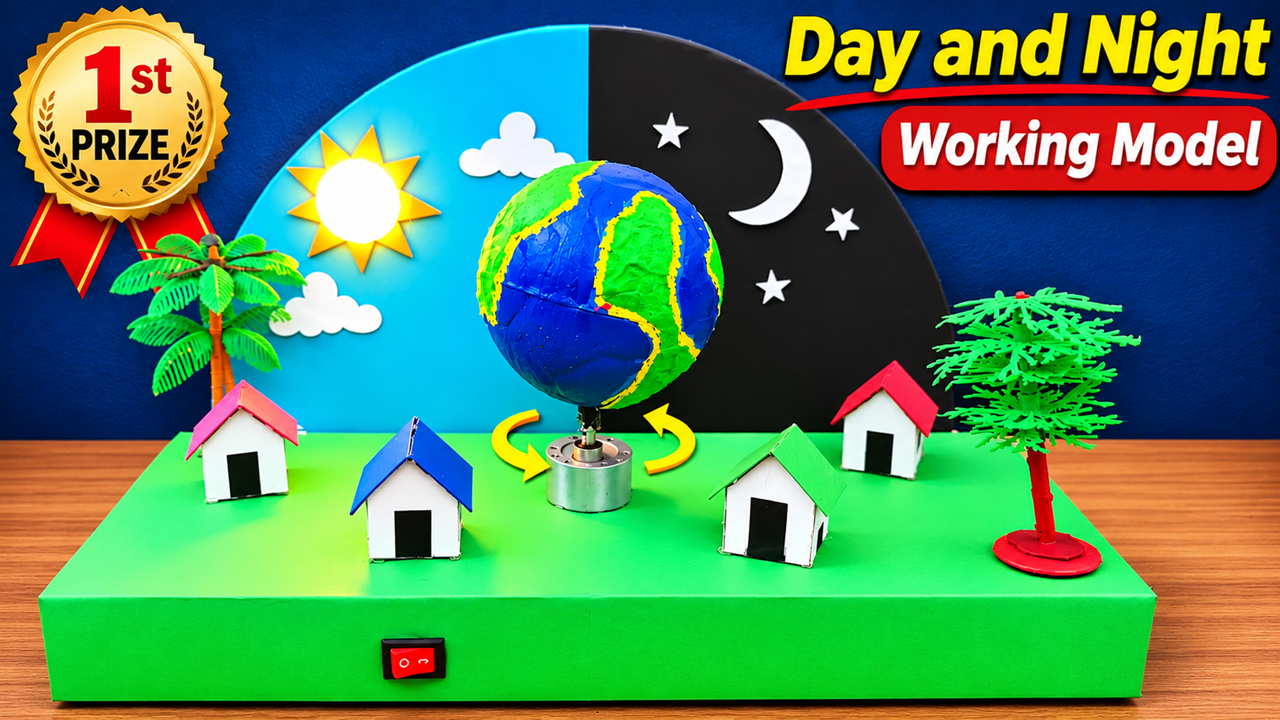
In this project, we have designed a Day and Night Working Model that demonstrates how the rotation of the Earth causes day and night. The model consists of a rotating Earth, a Sun, stars, a Moon and small houses representing different locations on Earth.
The main objective of this project is to help students understand Earth’s rotation through a simple and attractive working model.
2. Materials Required
To prepare this working model, we need the following materials:
- Large cardboard or thermocol sheet for the base.
- One thermocol ball or plastic globe for Earth.
- Blue, green and yellow colour papers or acrylic paints.
- One small DC geared motor.
- Battery or suitable DC power supply.
- ON/OFF switch.
- Connecting wires.
- Small LED light to represent the Sun.
- Black chart paper for the night sky.
- Blue chart paper for the daytime sky.
- White colour paper for clouds, Moon and stars.
- Cardboard pieces for making small houses.
- Ice cream sticks or plastic pipes.
- Small artificial trees.
- Glue gun, scissors, cutter and adhesive tape.
3. How to Make the Model
Step 1: Prepare the Base
Take a large rectangular cardboard or thermocol sheet. Cover the upper surface with green colour paper to represent the Earth’s surface or ground.
Cover the front and sides with green chart paper. Make sure the base is strong enough to support the rotating globe and motor.
Step 2: Prepare the Day and Night Background
Take a large rectangular cardboard sheet and fix it vertically at the back of the base.
Divide the background into two equal sections.
- Cover the left side with blue colour paper to represent daytime.
- Cover the right side with black colour paper to represent nighttime.
On the daytime side, make a Sun using yellow and orange colour paper. Add white clouds around it.
On the nighttime side, make a crescent Moon and stars using white chart paper.
Step 3: Prepare the Earth Globe
Take a thermocol ball or plastic globe. Paint the entire ball blue to represent oceans.
Use green colour paper or paint to represent continents and land areas.
You can mark different continents such as Asia, Africa, Europe and Australia.
Allow the paint to dry completely.
Step 4: Install the DC Motor
Take a small DC geared motor and fix it firmly at the centre of the base.
Attach a suitable vertical shaft or supporting rod to the motor. Fix the Earth globe securely to the shaft.
Ensure that the globe rotates smoothly without falling or wobbling.
Step 5: Connect the Electrical Circuit
Connect the positive terminal of the battery to one terminal of the ON/OFF switch.
Connect the other switch terminal to the positive terminal of the DC motor.
Connect the negative terminal of the motor to the negative terminal of the battery.
When the switch is turned ON, the motor starts rotating the Earth globe.
Step 6: Prepare the Sun
Make a large Sun using yellow and orange chart paper. Fix a bright LED at its centre if you want to demonstrate sunlight more clearly.
Position the Sun on one side of the Earth so that it illuminates the globe.
Step 7: Prepare the Houses and Trees
Make small houses using cardboard and different colour papers. Place them around the rotating Earth to represent different locations.
Add artificial trees and decorative plants to make the model attractive.
Finally, attach labels such as EARTH, SUN, DAY, NIGHT and ROTATION.
Your Day and Night Working Model is now ready.
4. How Does the Working Model Work?
The working process begins when we switch ON the electrical circuit.
The battery supplies electricity to the DC geared motor. The motor starts rotating the Earth globe around its axis.
The Sun remains in a fixed position and represents the source of sunlight.
As the Earth rotates, different parts of the globe face the Sun at different times.
The half of the Earth facing the Sun receives sunlight and experiences daytime.
The opposite half remains away from direct sunlight and experiences nighttime.
For example, when one side of the Earth is facing the Sun, people living on that side experience daytime. At the same time, people on the opposite side experience nighttime.
As the Earth continues rotating, the day side gradually moves towards darkness, while the night side gradually moves towards sunlight.
This cycle repeats continuously.
It takes approximately 24 hours for the Earth to complete one rotation on its axis.
Thus, our model demonstrates that the rotation of the Earth causes the regular occurrence of day and night.
5. Important Scientific Concepts
1. Rotation: The spinning movement of the Earth around its own axis is called rotation.
2. Axis: An imaginary line passing through the North Pole and South Pole around which the Earth rotates.
3. Day: The part of the Earth receiving sunlight experiences daytime.
4. Night: The part of the Earth away from direct sunlight experiences nighttime.
5. Rotation Time: The Earth takes approximately 24 hours to complete one rotation.
6. Sunrise and Sunset: As a location rotates towards the Sun, it experiences sunrise. As it rotates away from the Sun, it experiences sunset.
6. Applications and Importance
- Helps us understand the occurrence of day and night.
- Explains the concept of Earth’s rotation.
- Helps us understand sunrise and sunset.
- Explains differences in local time across the world.
- Helps us understand time zones.
- Supports the study of geography and astronomy.
- Demonstrates the relationship between Earth and the Sun.
7. Advantages of This Project
- Makes astronomy easy to understand.
- Demonstrates Earth’s rotation practically.
- Helps students understand day and night visually.
- Encourages scientific thinking and creativity.
- Uses simple and easily available materials.
- Makes science learning interesting and interactive.
8. Conclusion
Our Day and Night Working Model demonstrates how the rotation of the Earth causes daytime and nighttime.
The Earth continuously rotates on its axis. The side facing the Sun experiences daylight, while the opposite side experiences darkness.
This natural process repeats every day and plays an important role in maintaining the daily cycle of life on Earth.
By understanding this concept, we can learn more about our planet and its movements in space.
Our message is: THE EARTH NEVER STOPS ROTATING, AND EVERY ROTATION BRINGS A NEW DAY!
9. Science Exhibition – Short Presentation Script
Good morning, respected judges, teachers and my dear friends.
My project name is Day and Night Working Model.
Do you know why we experience day and night?
The main reason is the rotation of the Earth on its axis.
In our model, we have created a rotating Earth using a DC geared motor.
When I switch ON the system, the motor starts rotating the Earth.
The Sun remains in a fixed position and provides light to one half of the Earth.
The side facing the Sun experiences daytime, while the opposite side experiences nighttime.
As the Earth continues rotating, different places move from day to night and from night to day.
The Earth takes approximately 24 hours to complete one rotation.
This natural process is responsible for the regular occurrence of day and night.
My message is: UNDERSTAND OUR EARTH, EXPLORE SPACE AND KEEP LEARNING SCIENCE!
Thank you!