In this post i will be demonstrating via experiment using convex lens how image formation for physics practical project model | DIY
#convexlens #physics #physicsproject #projectmodel #diy #howtofunda

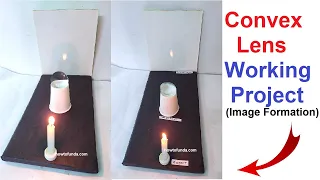
Creating a working model to demonstrate image formation by a convex lens using simple materials such as a paper cup, convex lens, candle, and white paper is a fantastic way to visualize the principles of optics.
Here’s how you can make and demonstrate this model:
Materials Needed
- Convex lens
- Paper cup
- Candle (or small LED light to represent a candle for safety)
- White paper (to act as the screen)
- Cardboard (for the base)
- Scissors
- Glue or tape
- Ruler
- Marker or pen
Step by Step Procedure on Convex Lens Working Project
1. Prepare the Base and Structure
- Base Board:
- Cut a rectangular piece of cardboard to serve as the base. This will hold the entire setup and keep it stable.
- Paper Cup for Lens Holder:
- Take a paper cup and cut a circular hole in the bottom that matches the diameter of your convex lens. This will hold the lens in place.
- Carefully insert the convex lens into the hole. Ensure it fits snugly and is stable. You can use glue to secure the lens if necessary.
2. Set Up the Lens Holder and Screen
- Positioning the Lens Holder:
- Glue or tape the paper cup with the convex lens onto one end of the cardboard base. The lens should face horizontally.
- White Paper Screen:
- Cut a piece of white paper to act as the screen where the image will be formed.
- Attach the white paper to a vertical support (another piece of cardboard) and place it on the opposite end of the base from the lens holder.
- Ensure the screen is movable so you can adjust the distance between the lens and the screen.
3. Set Up the Candle or Light Source
- Candle Placement:
- Place a candle or a small LED light in front of the convex lens on the same side as the lens holder.
- The candle should be aligned with the center of the lens horizontally and vertically.
4. Demonstrating Image Formation
- Adjusting the Distance:
- Light the candle or turn on the LED light. Move the white paper screen back and forth until a clear image of the candle is formed on the screen.
- Observe the image formed on the screen. Depending on the distance between the candle, lens, and screen, you will see different types of images (real or inverted).
- Explaining the Concept:
- Demonstrate how the distance affects the image. For example, when the candle is placed at twice the focal length, the image will be real, inverted, and the same size as the object.
- Show different distances and explain how the image changes (e.g., closer than the focal point results in a virtual image, farther than the focal point results in a real, inverted image).
Presentation
- Interactive Demonstration:
- Allow viewers to adjust the screen themselves to see how the image changes with distance.
- Provide different objects or light sources to show how various objects form images through the convex lens.
- Educational Value:
- Explain the principles of refraction, focal length, and lens formulas in conjunction with the model to provide a comprehensive understanding of convex lens image formation.
By following these steps, you can create a clear, educational, and interactive model to demonstrate the principles of image formation by a convex lens using simple materials like a paper cup, candle, and white paper.
This project will effectively illustrate the concepts of optics and engage students in hands-on learning.