In this post we write about making of the computer network topology model – ring topology model – computer project model – diy using cardboard and color paper in simple and easy manner
What is Computer network topology?
A computer network topology is the layout or structure of a network, which determines how devices on the network are connected and how data is transmitted between them.
Types of computer network topology?
There are several common types of computer network topologies, including:
- Bus topology: In a bus topology, all devices on the network are connected to a single central cable or “bus,” which acts as a common communication path.
- Star topology: In a star topology, all devices on the network are connected to a central hub, which acts as a central point of communication.
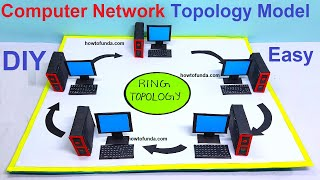
- Ring topology: In a ring topology, devices on the network are connected to one another in a circular pattern, with data traveling around the ring in one direction.
- Mesh topology: In a mesh topology, each device on the network is connected to every other device, creating multiple paths for data to travel between devices.
- Tree topology: In a tree topology, devices on the network are organized into a hierarchy, with a central root device and branches representing individual devices or smaller subnetworks.
#computertopology #topologymodel #ringtopology #computerproject #howtofunda #computermodel #desktopmodel #diy
Steps to make the computer network topology model using cardboard and paper
A computer network topology model making using cardboard and paper can be made by following these steps:
- You will need cardboard, paper, scissors, glue, and markers or colored pencils.
- Draw the desired network topology on paper, using symbols to represent the devices and lines to represent the connections between them.
- Cut out the devices from the cardboard using scissors. These can be represented as simple shapes such as circles or squares for computers or desktops or keyboards
- Cut out strips of paper or cardboard to represent the connections between the devices. Glue or tape the connections to the devices to create the network topology.
- Use markers or colored pencils to label the devices with their names or types (e.g. router, switch, computer).
- To make the model more realistic, you can add details such as ports, LEDs, or antennas.
- Once the model is complete, it can be displayed on a board or table for easy viewing.
This type of model can be a valuable tool for teaching students about computer networking, as it allows them to visualize the connections and flow of information in a network.
