
The purpose of creating a computer model using cardboard is to demonstrate the basic principles of computer hardware, architecture, and input-output mechanisms in a tangible and accessible way.
This hands-on approach allows students and enthusiasts to understand how computers process information, interact with users, and generate output using simple materials like cardboard, while fostering creativity and problem-solving skills.
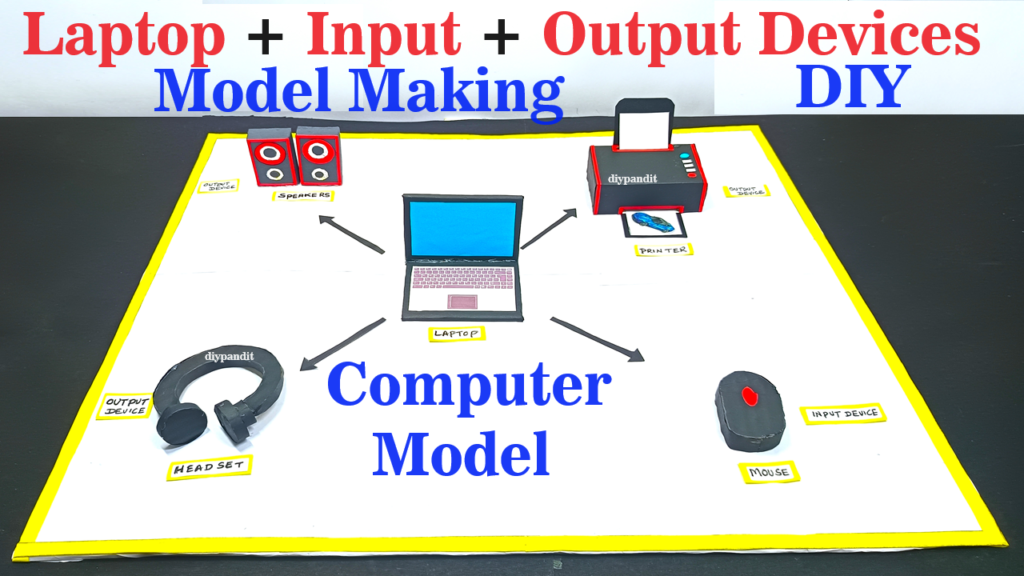
Creating a computer model using cardboard can be a fun and educational project. Here’s a step-by-step guide on how to make a cardboard model of a laptop, headset, speakers, printer, and mouse:
Materials Needed:
- Cardboard
- Scissors or a craft knife
- Glue or a hot glue gun
- Ruler
- Pencil
- Markers or paint for detailing
- Printouts or colored paper for screen and other details
Step-by-Step Instructions on laptop and input / output devices:
1. Laptop
- Base and Screen: Cut two rectangles from the cardboard, one for the base and one for the screen. The base should be slightly larger than the screen to accommodate the keyboard area.
- Hinge: Attach the screen to the base using a strip of cardboard as a hinge. Glue one edge of the strip to the back of the screen and the other edge to the base, allowing the screen to fold.
- Keyboard and Trackpad: Draw or print out a keyboard and trackpad design. Glue these onto the base of the laptop.
- Details: Add details such as ports, power buttons, and logos with markers or printed images.
2. Headset
- Headband: Cut a long, curved strip of cardboard for the headband.
- Ear Cups: Cut two circles for the ear cups. Attach these to the ends of the headband using glue.
- Mic: If desired, add a small strip of cardboard for the microphone, attaching it to one of the ear cups.
3. Speakers
- Main Box: Cut a rectangle for the front and smaller rectangles for the sides, top, and bottom. Glue these together to form the speaker box.
- Speaker Grilles: Draw or cut out circles from black paper for the speaker grilles and glue them onto the front of the speaker boxes.
4. Printer
- Body: Cut and assemble rectangles for the body of the printer. Make sure to leave an opening where paper would come out.
- Paper Tray: Add a small tray at the top or bottom of the printer for paper input/output.
- Details: Draw or print out a control panel and glue it to the top of the printer.
5. Mouse
- Body: Cut out an oval shape for the main body of the mouse.
- Buttons and Scroll Wheel: Add smaller pieces for the buttons and scroll wheel. You can use a thin strip of cardboard for the scroll wheel.