In this post I will be discussing on how to make the Atomic Structure Model Making
Creating an atomic structure model using GI wire, balls, and a cardboard base is a great hands-on project. This model will help visualize the arrangement of electrons around the nucleus in an atom. Here’s a step-by-step guide:

Materials Needed:
- GI Wire (Galvanized Iron Wire): Flexible enough to bend but sturdy.
- Small Balls: Different colors or sizes for protons, neutrons, and electrons (e.g., ping pong balls, beads, or Styrofoam balls).
- Cardboard Base: To support the structure.
- Paint and Markers: To color and label the balls.
- Glue or Hot Glue Gun: For assembling the parts.
- Scissors and Wire Cutters: For cutting cardboard and wire.
- Tape: To secure the wire to the base.
- Labels: For marking different parts of the atom.
Step by Step Video Instructions:
1. Prepare the Base:
- Cut the cardboard into a stable base. A square or rectangular piece will work well.
- Optionally, paint or decorate the cardboard to make it visually appealing.
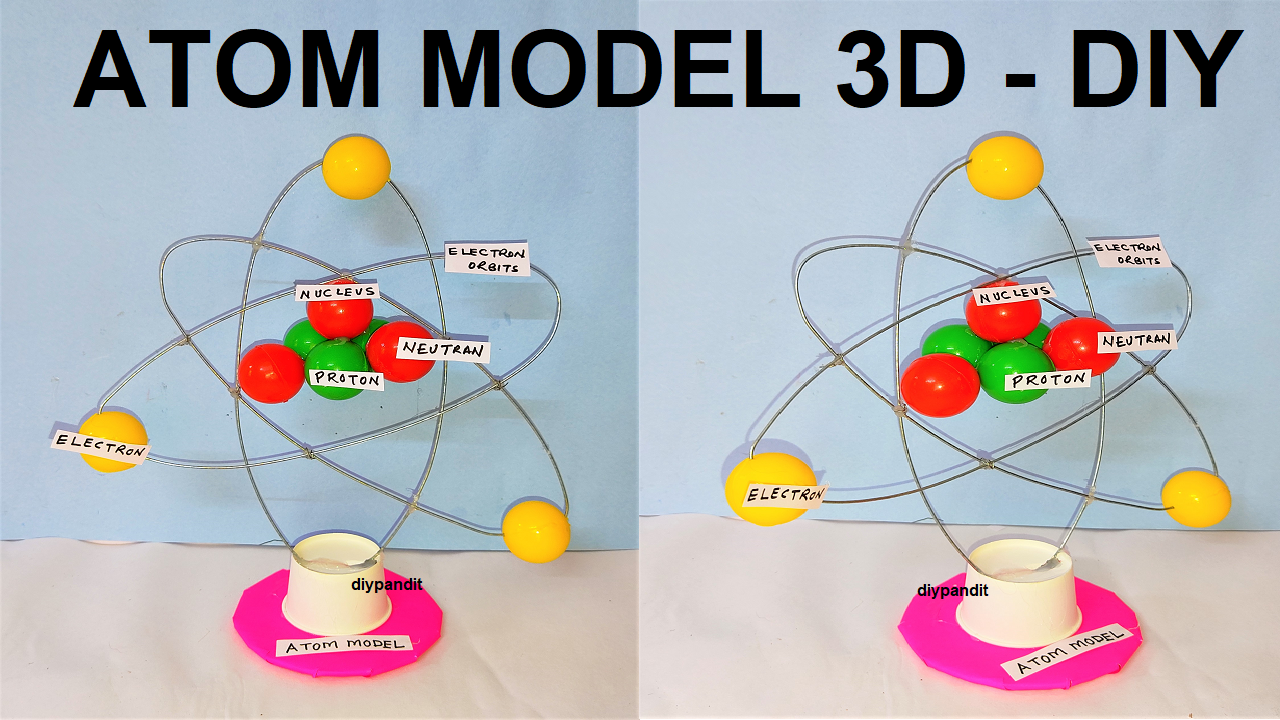
2. Create the Nucleus:
- Choose a few balls to represent protons and neutrons. Typically, you can use one color for protons and another for neutrons.
- Glue the proton and neutron balls together to form a cluster representing the nucleus. Allow it to dry completely.
3. Form the Electron Orbits:
- Cut the GI wire into pieces long enough to form circular or elliptical orbits around the nucleus.
- Bend the wire into circles or ellipses, making sure each wire piece represents a different electron shell (e.g., K, L, M shells).
- Secure the ends of the wire together with tape or by twisting them.
4. Attach the Electron Orbits to the Base:
- Make small holes in the cardboard base where the wire orbits will be attached.
- Insert the ends of each wire orbit into the holes and secure them underneath with tape or glue.
- Ensure the orbits are evenly spaced around the nucleus and are parallel to each other.
5. Place the Electrons:
- Choose smaller balls to represent electrons.
- Paint or mark the electron balls if needed.
- Attach the electron balls to the wire orbits using glue or by poking the wire through the balls.
6. Assemble the Model:
- Place the nucleus in the center of the wire orbits. You can glue it directly onto the base or suspend it slightly above the base using a small piece of wire.
- Ensure that the nucleus is stable and centered.
Conclusion:
This atomic structure model using GI wire, balls, and a cardboard base can effectively demonstrate the atomic structure’s key components. It is a great educational tool for visualizing how electrons orbit the nucleus in different shells.
#atomicstructures #atomicmodel #atomic #diy #modelmaking #scienceproject #howtofunda