In this post we write about making of skin model project ideas
Creating a skin anatomy model using a cardboard box and color paper is an excellent way to understand the different layers of the skin and their functions.

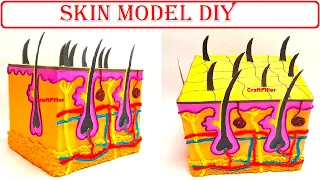
Let’s build a simple 3D model representing the layers of the skin: epidermis, dermis, and subcutaneous tissue.
Materials needed:
- Cardboard box (shoebox or any similar-sized box)
- Color paper (for the layers and details)
- Scissors
- Glue or double-sided tape
- Marker pens or sketch pens
Step-by-step instructions:
- Base:
- Take the cardboard box and remove the lid if it has one. We will use the open side as the base of the model.
- Epidermis:
- Cut out a piece of color paper to represent the epidermis layer.
- Attach this paper to the inside surface of the open side of the cardboard box using glue or double-sided tape. This layer will be the outermost layer of the skin.
- Dermis:
- Cut another piece of color paper to represent the dermis layer.
- Attach this paper to the inside surface of the cardboard box, just below the epidermis layer. The dermis is the middle layer of the skin.
- Subcutaneous Tissue:
- Cut one more piece of color paper to represent the subcutaneous tissue (also known as the hypodermis).
- Attach this paper to the inside surface of the cardboard box, just below the dermis layer. The subcutaneous tissue is the innermost layer of the skin.
- Labeling and Details:
- Use marker pens or sketch pens to label each layer accordingly. You can also add arrows or other details to indicate the position and functions of each layer.
- Additional Details:
- If you want to include more details in the model, such as hair follicles, sweat glands, or nerve endings, you can cut out smaller pieces of color paper and attach them appropriately to represent these structures.
- Use markers or color paper to decorate the outside of the cardboard box. You can draw or add labels related to skin anatomy to make it visually appealing.
Now, you have a simple 3D skin anatomy model using a cardboard box and color paper. This model can be used as a visual aid to explain the layers of the skin and their functions. It’s an engaging and interactive way to learn about the structure and importance of the skin in protecting our body and maintaining homeostasis.
#skinmodel #scienceproject #craftpiller #biologymodel #zoologymodel #scienceexhibition #sciencemodel #sciencefair