In this post we show you how to make parts of tree model
Creating a parts of a tree model using cardboard and color paper can be a great way to learn about the different components of a tree and its anatomy.

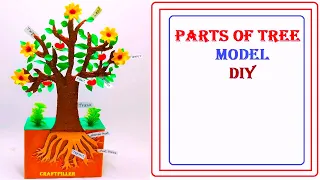
Let’s build a simple 3D tree model representing its main parts: roots, trunk, branches, leaves, and fruits.
Materials needed:
- Cardboard (for the base and tree structure)
- Brown and green color paper (for the trunk and leaves, respectively)
- Scissors
- Glue or double-sided tape
- Marker pens or sketch pens
Step-by-step Video instructions:
- Base:
- Cut a rectangular or square piece of cardboard to serve as the base of the tree model.
- Trunk:
- Cut a vertical strip from brown color paper to represent the trunk of the tree.
- Attach the trunk to the base vertically, positioning it towards the center.
- Branches:
- Cut smaller strips from brown color paper to represent the branches of the tree.
- Attach these branches to the trunk at various angles, extending outwards.
- Leaves:
- Cut small leaf shapes from green color paper to represent the leaves of the tree.
- Attach the leaves to the branches, scattering them around the tree.
- Roots:
- Cut thin, elongated strips from brown color paper to represent the roots of the tree.
- Attach these roots to the base, spreading them out from the bottom of the trunk.
- Fruits & flowers :
- If you want to include fruits & flowers on your tree, cut small circular or oval shapes from color paper to represent the fruits.
- Attach the fruits & flowers to the branches or add them on the tree as desired.
- Labeling and Details:
- Use marker pens or sketch pens to label each part of the tree accordingly (e.g., trunk, branches, leaves, roots).
- Add any other details you want to include, such as veins on the leaves or texture on the trunk.
- Decorating the Model:
- Use markers or color paper to decorate the tree model and add more details to make it visually appealing.
- You can add grass or flowers around the base of the tree to complete the scene.
Now, you have a simple 3D tree model made from cardboard and color paper. This model can be a helpful visual aid to learn about the different parts of a tree and their functions.
#partsoftree #partsoftreemodel #craftpiller #scienceexhibition #sciencemodel #scienceproject #biologymodel #botanymodel