
In the dynamic realm of industrial engineering, efficient material handling stands as a cornerstone of productivity and progress.
Among the many ingenious mechanisms that have transformed this field, the screw conveyor stands as an unsung hero, silently orchestrating the seamless transport of materials across diverse industries.
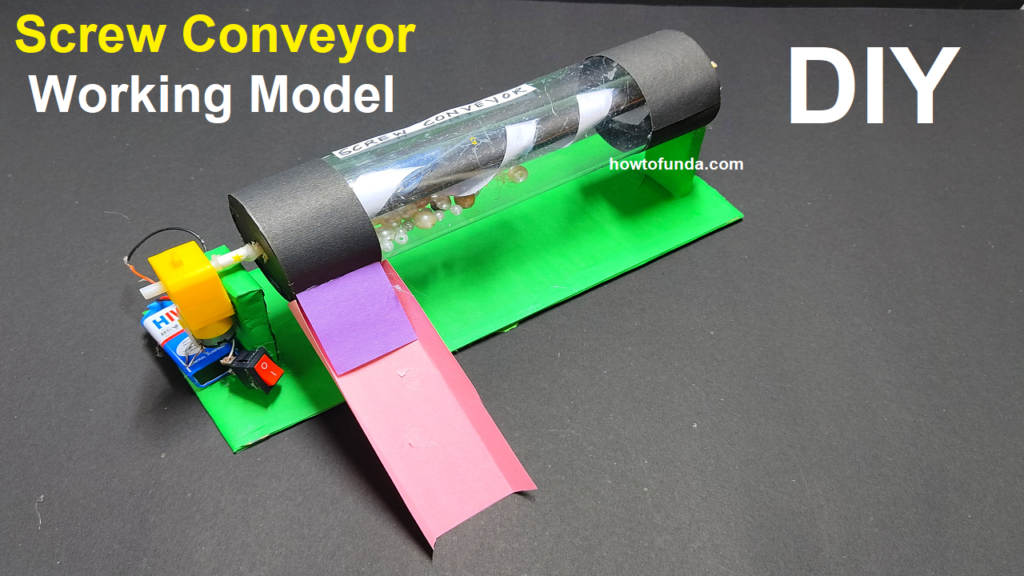
The “Screw Conveyor” is a mechanical marvel that exemplifies the power of simple yet ingenious design. It comprises a helical screw, enclosed within a cylindrical casing, that, when rotated, propels granular or powdery materials along its length.
This elegantly straightforward apparatus has found its application in countless industries, from agriculture to manufacturing, cement production to wastewater treatment.
Building a working model of a screw conveyor is a great way to understand the basic principles of material handling and mechanical engineering. Here’s how you can create a simple screw conveyor model:
Materials Needed:
- Cardboard (for the base and conveyor structure)
- PVC pipe or cardboard tube (to simulate the screw)
- Wooden dowel or metal rod (to act as the shaft of the screw)
- Nuts, bolts, and washers
- Small pieces of plywood or cardboard (for supports and guides)
- Glue, tape, scissors, and a cutter
- Small plastic balls or other small objects (to simulate material being transported)
Steps:
Building the Screw Conveyor:
- Prepare the Base:
- Cut a rectangular piece of cardboard to serve as the base of your model. Ensure it’s large enough to hold the entire conveyor structure.
- Create the Screw:
- Take the PVC pipe or cardboard tube and cut it to the desired length. This will be the outer casing of the screw. It should be slightly longer than the base.
- Construct the Shaft:
- Insert a wooden dowel or metal rod into the center of the PVC pipe to act as the shaft of the screw. Make sure it’s securely attached and runs along the length of the pipe.
- Attach Supports and Guides:
- Create supports for the screw conveyor by attaching small pieces of plywood or cardboard perpendicular to the base. These will hold the screw in place.
- Add the Screw Flighting:
- Cut a strip of cardboard or plastic and attach it spirally around the PVC pipe to create the flighting (the blades of the screw). Ensure it’s evenly spaced and securely attached.
- Install the Bearings:
- Attach bearings or bushings to both ends of the PVC pipe to allow smooth rotation of the screw. These will act as the pivot points.
Setting Up the Model:
- Mount the Motor (Optional):
- If you want to demonstrate motorized operation, attach a small DC motor to the base. Connect it to the shaft of the screw using a belt and pulley system.
- Position the Material Inlet and Outlet:
- Create small openings in the base at one end for material intake and at the other end for material discharge. These openings should be aligned with the screw flighting.
- Simulate Material Handling:
- Use small plastic balls or other small objects to represent the material being transported. Place them at the inlet and observe how they move along the screw conveyor.
- Demonstrate Operation:
- Turn on the motor (if included) or manually rotate the screw to observe how the material is transported from the inlet to the outlet.
This working model effectively demonstrates the principle of material handling using a screw conveyor, providing a hands-on learning experience about the mechanics involved in this common industrial process.