In this project we write about making of the water purification (purifier) working model – waste management – inspire award science project- diy using simple things at home
#waterpurification #workingmodel #wastemanagement #scienceproject #diy #diypandit #scienceexhibition #waterpurification #sciencefair #inspireaward #inspireawardproject #waterpurifier

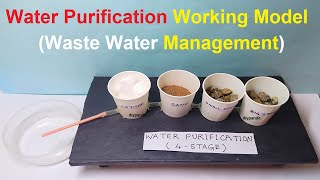
Creating a water purification working model using paper cups for four-stage purification is a practical and educational project.
Here’s a step-by-step guide to help you build this model:
Materials Needed
- 4 paper cups (for stages of purification)
- Plastic tray (for storing purified water)
- Sand
- Cotton balls or cotton wool
- Gravel or small stones
- Activated carbon or crushed charcoal (for coal stage)
- Water (for demonstration)
- Clear plastic tubing or straws (for water flow)
- Hot glue gun or waterproof adhesive
- Scissors
- Marker
- Ruler
- Tape
Video instruction on making of water purification (purifier) working model – waste management – inspire award science project- diy
1. Prepare the Base and Setup
- Base Setup:
- Use a plastic tray as the base for your model. This will hold the cups and store purified water.
2. Create the Purification Stages
- Sand Stage (Filtration):
- Take one paper cup and label it “Sand”. Fill this cup with a layer of sand.
- Use a drill or awl to create small holes in the bottom of the cup for drainage.
- Place this cup at the beginning of the purification process to filter out large particles.
- Cotton Stage (Filtration):
- Take another paper cup and label it “Cotton”. Fill this cup with a layer of cotton balls or cotton wool.
- Create small holes in the bottom of the cup for drainage.
- Place this cup after the sand stage to filter finer particles and debris.
- Gravel Stage (Filtration):
- Take the third paper cup and label it “Gravel”. Fill this cup with a layer of gravel or small stones.
- Create small holes in the bottom of the cup for drainage.
- Place this cup after the cotton stage to further filter and aerate the water.
- Coal Stage (Adsorption):
- Take the fourth paper cup and label it “Coal”. Fill this cup with a layer of activated carbon or crushed charcoal.
- Create small holes in the bottom of the cup for drainage.
- Place this cup last in the purification process to absorb impurities and improve taste.
3. Connect the Purification Stages
- Water Flow:
- Use clear plastic tubing or straws to connect the bottom of each cup sequentially.
- Ensure the tubing reaches from the coal stage to the plastic tray at the base to collect purified water.
4. Test and Demonstrate
- Testing:
- Pour water into the “Sand” cup to simulate dirty water entering the purification system.
- Observe how each stage filters the water as it flows through the cups.
- Collect the purified water in the plastic tray at the end of the process.
- Explanation:
- Explain each stage of purification to viewers, highlighting how sand filters out large particles, cotton removes finer impurities, gravel aids in filtration and aeration, and coal absorbs remaining contaminants.
By following these steps, you’ll create an informative and functional water purification working model using paper cups for different stages of filtration.