Thermal electricity refers to the generation of electrical energy from temperature differences or thermal gradients.
One intriguing way to explore this phenomenon is through the use of a Thermoelectric Peltier device. The Peltier effect, named after French physicist Jean Charles Athanase Peltier, is the phenomenon where an electric current is produced at the junction of two different conductors when a temperature difference is applied across them.
This project demonstrates the principle of thermoelectricity, where a temperature difference across a semiconductor material generates an electric current.
It’s a hands-on way to understand the conversion of heat energy into electrical energy using a Thermoelectric Peltier device.

Creating a thermal electricity working model that converts heat energy into electrical energy using a Thermoelectric Peltier device, ice, and a DC motor can be an interesting and educational project.
Here’s a simple do-it-yourself (DIY) guide to build such a model:
Materials Needed:
- Thermoelectric Peltier module
- Heat sink
- Insulating material (e.g., Styrofoam)
- Ice or a cold source
- DC motor
- Small fan (optional)
- Heat source (e.g., candle or heat lamp)
- Wires
- Alligator clips
- Power source (e.g., battery)
Instructions:
1. Prepare the Thermoelectric Peltier Module:
- Connect the Thermoelectric Peltier module to the heat sink. Apply thermal paste between the module and the heat sink for better heat transfer.
2. Create a Cold Side:
- Attach the cold side of the Peltier module to an insulating material (Styrofoam). This side will face the ice or cold source.
3. Create a Hot Side:
- Attach the hot side of the Peltier module to a heat source (e.g., candle or heat lamp). Ensure proper insulation around the hot side.
4. Connect the DC Motor:
- Connect the wires from the Peltier module to the DC motor. Use alligator clips for a secure connection.
5. Optional: Add a Small Fan:
- If available, you can attach a small fan to enhance air circulation and heat dissipation from the hot side.
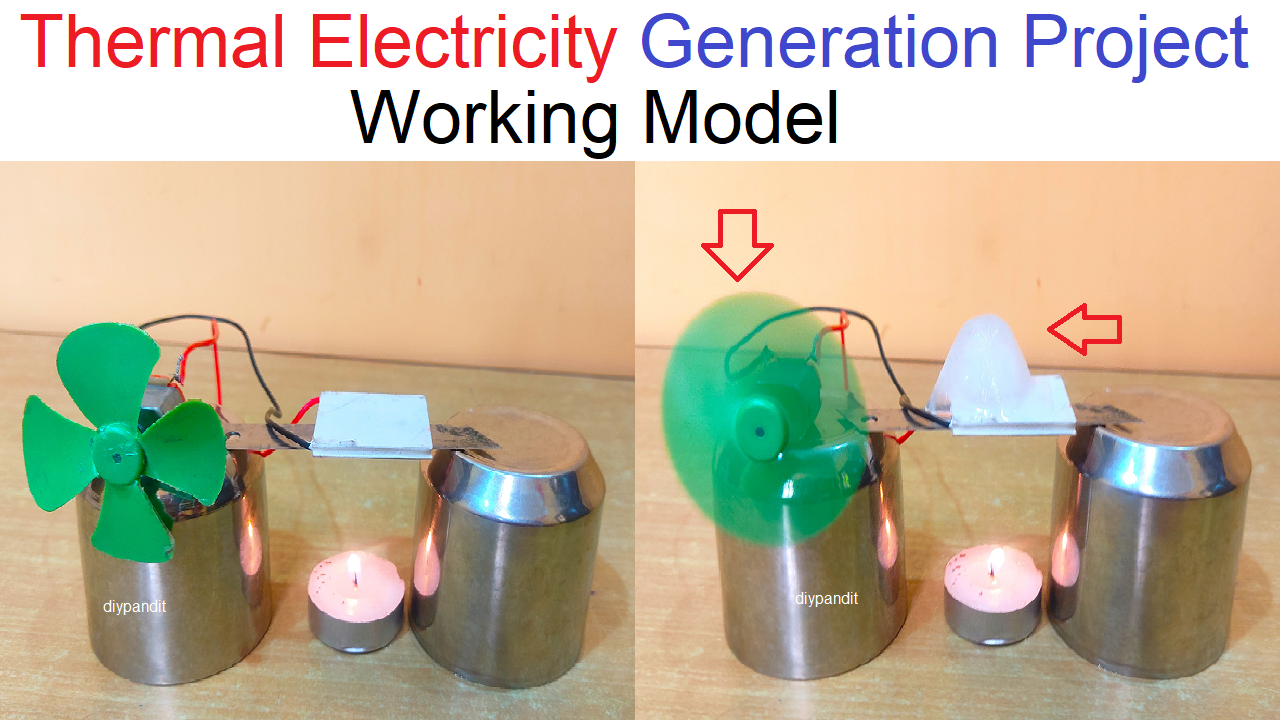
6. Test the Model:
- Place the entire setup on a stable surface.
- Turn on the heat source and observe the movement of the DC motor. The temperature difference between the hot and cold sides generates electricity, causing the motor to spin.
7. Experiment with Ice:
- Introduce ice or a cold source to the cold side of the Peltier module. Observe any changes in the motor’s behavior.
8. Troubleshoot and Experiment:
- Experiment with adjusting the distance between the heat source and cold source.
- Monitor the effects of temperature variations on the electricity generated.
9. Document Your Observations:
- Record your observations, noting the impact of different factors on the model’s performance.