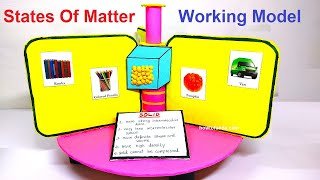
In this project, we’ll create a working model to demonstrate the three states of matter (solid, liquid, and gas) using cardboard and colored paper.
The model will have a partition to separate the different states and will be rotatable for interactive learning. Here are the steps:
Materials Needed:
- Cardboard sheets
- Colored paper or construction paper
- Scissors
- Glue or adhesive tape
- Markers or pens
- Small rotating platform (e.g., Lazy Susan base, optional but recommended)
Building the States of Matter Model:
1. Creating the Base:
Step 1: Cut out a large circular piece of cardboard to serve as the base of your model. This circular base will allow for easy rotation.
Step 2: Reinforce the base by attaching additional layers of cardboard underneath for stability, especially if a rotating platform is not used.
2. Designing the Partition:
Step 3: Cut out a circular piece of cardboard to serve as the partition in the center of the base. This will separate the three sections for solid, liquid, and gas.
Step 4: Attach colored paper to both sides of the partition to represent different states of matter (e.g., brown for solid, blue for liquid, and yellow for gas).
3. Representing Solid State:
Step 5: Within the solid section, create small models or representations of solid objects using colored paper. These could be cubes, spheres, or any common solid shapes.
Step 6: Attach these solid objects to the brown section using glue or adhesive tape.
4. Representing Liquid State:
Step 7: Within the liquid section, create representations of liquid substances. Use colored paper to create flowing or splashing shapes to represent liquid.
Step 8: Attach these liquid representations to the blue section using glue or adhesive tape.
5. Representing Gas State:
Step 9: Within the gas section, create representations of gas molecules or particles using colored paper. These could be small dots or cloud-like shapes.
Step 10: Attach these gas representations to the yellow section using glue or adhesive tape.
6. Rotating Mechanism:
Step 11: If using a rotating platform, attach it securely to the bottom of the cardboard base. Ensure it allows for smooth manual rotation.
7. Final Touches:
Step 12: Label each section (“Solid,” “Liquid,” “Gas”) using markers or colored paper for easy identification.
Step 13: Use markers or pens to add any additional details or labels to your model.
Your States of Matter working model with partition and rotation is now complete! This interactive model provides a visual and tactile representation of the three states of matter. It’s an engaging educational tool to help understand the characteristics of solids, liquids, and gases.
In this post we have depicted on how to explain the states of matter working model in English #statesofmatter #workingmodel #explanation #english #howtofunda

