
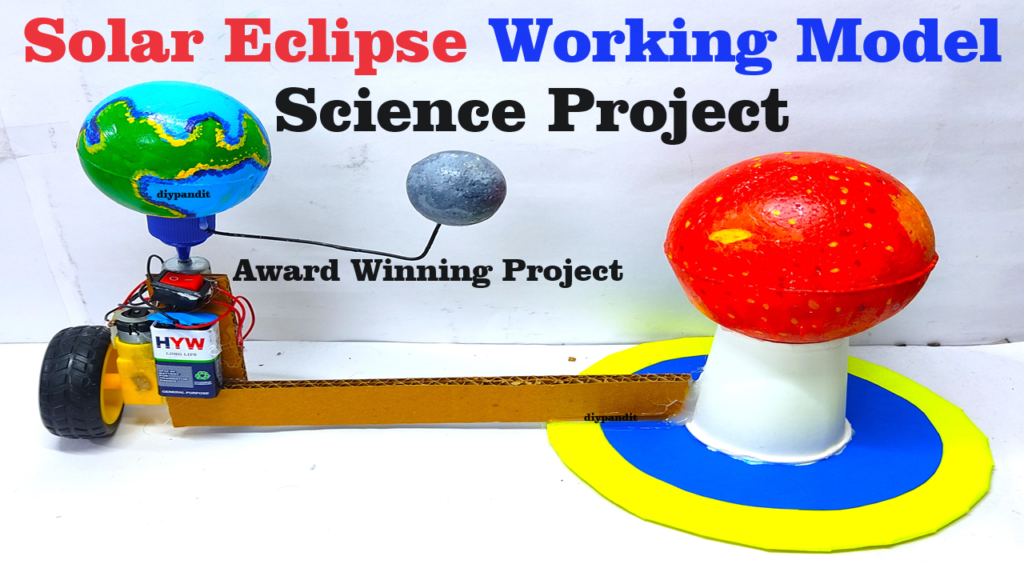
Creating a working model to demonstrate solar and lunar eclipses using three balls (representing the Earth, Sun, and Moon), DC motors, a 9V battery, and cardboard is a great way to visualize these astronomical phenomena.
Here’s a step-by-step guide to help you build this model:
Materials Needed:
- Three balls – To represent the Sun, Earth, and Moon (e.g., a large ball for the Sun, medium for the Earth, and small for the Moon).
- Two DC motors – To rotate the Earth and the Moon.
- 9V battery and battery holder – To power the motors.
- Cardboard – To construct the base and the arms.
- Hot glue gun or strong adhesive – For assembly.
- Wires and switch – To connect the motors to the battery.
- Markers or paints – For labeling and decorating the balls.
- Scissors or craft knife – For cutting cardboard.
- Ruler and compass – For accurate measurements.
- Sturdy base (e.g., wooden or plastic board) – To mount the entire setup.
Step-by-Step Instructions:
Step 1: Prepare the Balls
- Label the Balls:
- Label the largest ball as the Sun, the medium one as the Earth, and the smallest as the Moon.
- Paint the Balls (optional):
- Paint the Sun yellow, the Earth blue with green continents, and the Moon grey for better visual representation.
Step 2: Create the Base and Arms
- Cut the Base:
- Cut a large piece of cardboard or use a sturdy board as the base to support the entire model.
- Create the Arms:
- Cut two long strips of cardboard to act as arms. One arm will hold the Earth, and the other, attached to the Earth, will hold the Moon.
- Ensure the arms are long enough to show the relative distances between the Sun, Earth, and Moon.
Step 3: Mount the Sun
- Fix the Sun:
- Securely attach the Sun ball to one end of the base using hot glue or strong adhesive. The Sun should be fixed and not move.
Step 4: Setup the Earth and Moon Rotation
- Attach the Earth:
- Fix the first DC motor to the base, ensuring it can rotate horizontally. Attach the cardboard arm to this motor’s shaft and then attach the Earth ball to the end of this arm. The motor will rotate the Earth around the Sun.
- Attach the Moon:
- Fix the second DC motor to the end of the first arm (near the Earth). Attach the second cardboard arm to this motor’s shaft and then attach the Moon ball to the end of this arm. This motor will rotate the Moon around the Earth.
Step 5: Wiring the Motors
- Connect the Motors:
- Connect the wires from each motor to the battery holder. Use a switch to control the power supply to the motors.
- Ensure that the Earth’s motor rotates slowly enough to simulate its orbit around the Sun and that the Moon’s motor rotates more rapidly to simulate its orbit around the Earth.
- Secure the Wiring:
- Use tape or hot glue to secure the wiring and ensure it doesn’t interfere with the rotation of the arms.
Step 6: Testing and Final Adjustments
- Test the Rotation:
- Turn on the motors using the switch and observe the rotation of the Earth around the Sun and the Moon around the Earth.
- Make any necessary adjustments to the alignment of the arms or the stability of the base.
Step 7: Demonstrating Eclipses
- Positioning for Eclipses:
- To demonstrate a solar eclipse, position the Moon between the Sun and the Earth such that the Moon casts a shadow on the Earth.
- To demonstrate a lunar eclipse, position the Earth between the Sun and the Moon such that the Earth casts a shadow on the Moon.
Summary:
This rotating model will effectively demonstrate the mechanics of solar and lunar eclipses. The Sun remains fixed while the Earth and Moon rotate around their respective centers, powered by DC motors. This interactive model will help students visualize and understand the alignment and movement of celestial bodies during eclipses.