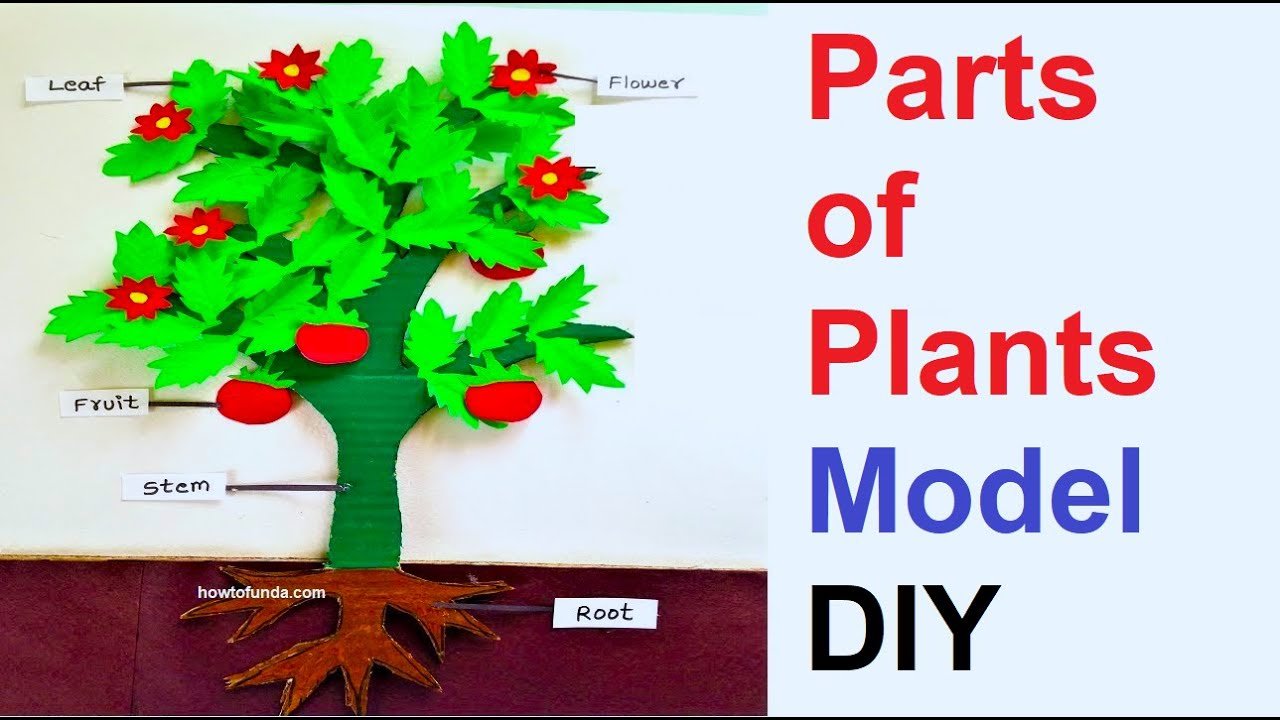
Understanding the functions and characteristics of these plant parts is essential for studying plant biology, ecology, and agriculture.
Each part plays a vital role in the plant’s growth, development, and interaction with its environment.
In biology, the parts of a plant refer to the various structures and organs that make up a plant’s body and enable its growth, reproduction, and survival. These parts include:
- Roots: Structures that anchor the plant in the soil, absorb water and nutrients from the ground, and store food reserves.
- Stem: The main structural axis of the plant that supports the leaves, flowers, and fruits. It also transports water, nutrients, and sugars between the roots and the rest of the plant.
- Leaves: Organs responsible for photosynthesis, the process by which plants convert sunlight, water, and carbon dioxide into sugars and oxygen. Leaves also regulate water loss through transpiration and exchange gases with the atmosphere.
- Flowers: Reproductive structures of flowering plants (angiosperms) that produce seeds through the process of pollination and fertilization. Flowers attract pollinators such as insects and birds and develop into fruits containing seeds.
- Fruits: Structures that develop from fertilized flowers and protect the seeds within. Fruits aid in seed dispersal by animals and wind, contributing to the plant’s reproductive success.
How to make the parts of plant model making
Creating a science project model of the parts of a plant with flowers and roots using cardboard and colored paper is an excellent way to learn about plant anatomy.

Here’s a step-by-step guide:
Materials Needed:
- Cardboard sheets
- Colored paper (green, brown, yellow, and other colors for detailing)
- Scissors
- Glue or adhesive
- Pencil
- Ruler
- Markers or pens
Step by Step Video Instructions:
1. Base Preparation:
- Cut a large rectangular piece of cardboard to serve as the base of your model.
- This represents the ground or soil where plants grow.
2. Stem and Roots:
- Cut a long strip of green colored paper for the stem of the plant.
- Attach the stem vertically to the center of the cardboard base using glue.
- Draw thin lines or use markers to represent texture on the stem.
- Cut thin strips of brown colored paper for the roots.
- Attach the roots to the bottom of the stem, spreading them out horizontally.
3. Leaves:
- Cut leaf shapes out of green colored paper.
- Glue the leaves onto the stem at various intervals to represent foliage.
- Draw lines on the leaves to create veins for a realistic look.
4. Flowers:
- Cut out flower shapes from colored paper (yellow, red, etc.).
- Attach the flowers to the stem at appropriate locations.
- Draw details such as petals and a center on each flower.
5. Fruits and Seeds
- If desired, cut out fruit shapes (e.g., apple, tomato) or seed shapes (e.g., pea, sunflower seed) from colored paper.
- Attach them to the appropriate parts of the plant (e.g., flowers, stem) using glue.
- Add details such as seeds or segments to the fruits.
6. Labeling:
- Write or print labels for each part of the plant (e.g., stem, roots, leaves, flowers).
- Attach the labels to the corresponding parts of the model using glue or tape.
7. Display:
- Once the model is complete, place it in a visible location where it can be easily seen and admired.
- Consider adding a title or caption to the display to explain what the model represents.

