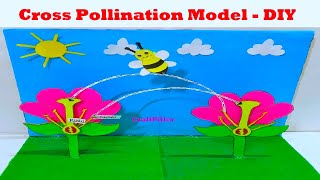
In this post we write of making pollination model for science project exhibition | biology projects
Creating a cross-pollination model using cardboard and colored paper is a fun and educational project that demonstrates how plants transfer pollen from one flower to another.

Here’s a step-by-step guide to making a simple cross-pollination model:
Materials you’ll need:
- Cardboard or thick cardstock (for the base and flower components)
- Colored paper (various colors for different flower parts)
- Scissors
- Glue or adhesive tape
- Markers or colored pens (optional, for additional details)
Step-by-step process:
- Prepare the base:
- Cut out a rectangular or square piece of cardboard or thick cardstock to serve as the base for your cross-pollination model. The size can vary depending on how detailed you want the model to be.
- Create the flower components:
- Use colored paper to cut out shapes representing the various parts of a flower, such as petals, sepals, stamens, and pistils. You can choose different colors to make each part easily distinguishable.
- Assemble the flower:
- Glue or tape the paper cutouts together to create a complete flower structure. For example, the petals can be attached around the center of the flower, where the stamens and pistils are located.
- Make pollen:
- Use yellow or a contrasting color of paper to create small circles or dots to represent pollen. You can attach these pollen pieces to the tips of the stamens using glue.
- Prepare another flower:
- Create another identical flower using the same colored paper. This will represent a different flower from the same plant or a different plant of the same species.
- Introduce cross-pollination:
- Position the two flowers next to each other on the cardboard base. To demonstrate cross-pollination, gently transfer some pollen from the stamens of one flower to the pistils of the other flower. You can use tweezers or simply touch the pollen to the pistils.
- Use markers or colored pens to add additional details and labels to the cross-pollination model. You can label the flower parts (petals, sepals, stamens, pistils) and add arrows to indicate the transfer of pollen.
- This simple model effectively demonstrates the basic concept of cross-pollination and helps learners understand how plants transfer pollen between flowers.
#pollinationmodel #scienceproject #craftpiller #biologymodel #scienceexhibition #sciencemodel #sciencefair