In this project I have shown how to make the human digestive system working model science project for science exhibition using cardboard and syringes in simple and easy manner in step by step
#humandigestivesystem #workingmodel #scienceproject #scienceexhibition #sciencefair #howtofunda

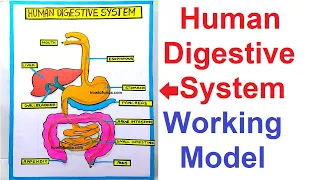
Creating a working model of the human digestive system using cardboard, colors, syringes, and tubing is an excellent educational project.
This model will help illustrate how food travels through the digestive system and is processed by various organs.
Here’s a step-by-step guide to help you build this model:
Materials Needed
- Cardboard (for constructing organs)
- Colored paper or paints (to decorate organs)
- Syringes (to simulate the movement of food and digestive juices)
- Flexible plastic tubing (to represent the digestive tract)
- Hot glue gun or craft glue
- Scissors
- Ruler
- Markers
- Labels (for naming the organs)
- Clear plastic containers (optional, to represent stomach and intestines)
Video Steps on how to make the human digestive system working model science project for science exhibition
1. Create the Organ Templates
- Draw and Cut Out Organ Shapes:
- Draw the shapes of the main digestive organs on cardboard. This includes the mouth, esophagus, stomach, small intestine, large intestine, liver, and pancreas.
- Cut out these shapes using scissors.
- Decorate the Organs:
- Use colored paper or paints to decorate each organ. Make sure each organ is easily identifiable.
- Label each organ with its name.
2. Set Up the Digestive Tract
- Esophagus and Tubing:
- Attach a piece of flexible plastic tubing to the mouth cutout to represent the esophagus.
- Ensure the tubing is long enough to connect to the stomach cutout.
- Stomach:
- If using a clear plastic container for the stomach, cut a hole in the bottom to insert the tubing from the esophagus.
- Secure the tubing with hot glue to prevent leaks.
- Small and Large Intestines:
- Use longer pieces of tubing to represent the small and large intestines.
- Attach the tubing to the stomach cutout or container, ensuring it winds around to mimic the intestines’ coiled structure.
- Secure the ends of the tubing to the cutouts representing the rectum and anus.
3. Connect the Accessory Organs
- Liver and Pancreas:
- Attach smaller pieces of tubing from the liver and pancreas cutouts to the small intestine tubing. These will represent the bile and pancreatic ducts.
- Assembly on a Base:
- Arrange all the organ cutouts and tubing on a large piece of cardboard as a base.
- Glue the organs in place, ensuring the tubing follows the correct path of the digestive tract.
4. Integrate the Syringes
- Simulating Digestive Processes:
- Attach syringes to different sections of the tubing to simulate the movement of food and digestive juices.
- Place a syringe at the mouth to introduce “food” (colored water).
- Attach other syringes along the tubing to demonstrate the movement of food and the addition of digestive juices from the liver and pancreas.
- Securing Syringes:
- Use hot glue or tape to secure the syringes in place.
- Make sure the syringes can be easily operated to push the colored water through the tubing.
5. Test and Demonstrate the Model
- Testing:
- Fill the syringes with colored water to represent food and digestive juices.
- Demonstrate the process by pushing the water through the tubing, showing how food travels from the mouth, through the esophagus, into the stomach, and then through the intestines.
- Explaining the Digestive Process:
- Explain the function of each organ as the colored water passes through the system.
- Discuss how food is broken down and nutrients are absorbed during the journey through the digestive tract.
By following these steps, you’ll create an informative and visually engaging working model of the human digestive system using cardboard, colors, syringes, and tubing.