This project demonstrates the human digestive system by using simple materials to mimic each stage of the process.
It highlights how food is broken down mechanically and chemically, how nutrients are absorbed, and how waste is formed and expelled.
By understanding each component’s function and the overall system’s operation, students can gain a clearer understanding of how the human body processes food.
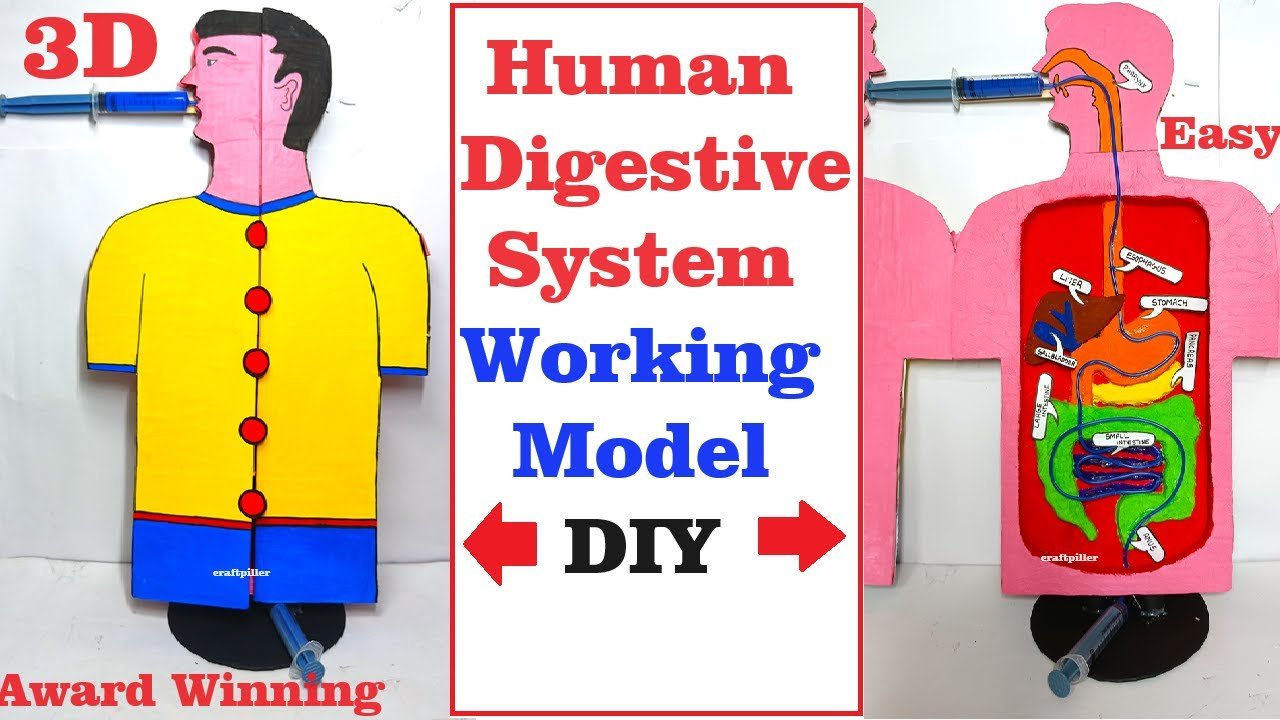
Creating a working model of the human digestive system using cardboard and syringes is an excellent way to demonstrate the process of digestion. The syringes can simulate the movement of food and digestive juices through the system.

Here’s a step-by-step guide to making this model:
Materials Needed:
- Cardboard
- Colored paper or paint
- Scissors
- Glue
- Marker pens
- Transparent plastic tubing (different sizes)
- Syringes (various sizes)
- Small balloons (optional, to represent stomach and intestines)
- String or rubber bands
- Tape
- Hot glue gun (optional for stronger bonds)
- Labels or stickers for parts of the digestive system
Steps:
Prepare the Base and Background:
- Cut Cardboard Base:
- Cut a large rectangular piece of cardboard to act as the base of your model. This will hold the entire digestive system layout.
- Create Digestive System Outline:
- Draw an outline of the human digestive system on the cardboard base. Include the mouth, esophagus, stomach, small intestine, and large intestine.
- Color and Label:
- Use colored paper or paint to color the different parts of the digestive system. Label each part with markers or stickers.
Build the Digestive System:
- Mouth and Esophagus:
- Use a syringe to represent the mouth. Attach a piece of transparent tubing to the syringe to represent the esophagus.
- Secure the tubing along the outline of the esophagus on the cardboard base.
- Stomach:
- Inflate a small balloon slightly to represent the stomach. Attach the end of the esophagus tube to the balloon.
- Secure the balloon to the cardboard base using glue or tape.
- Small Intestine:
- Attach another piece of tubing to the other end of the balloon (stomach). This tubing should be longer and coiled to represent the small intestine.
- Secure the tubing in a coiled shape along the outline of the small intestine on the cardboard base.
- Large Intestine:
- Attach a wider piece of tubing to the end of the small intestine tubing to represent the large intestine.
- Secure this tubing along the outline of the large intestine on the cardboard base.
- Rectum and Anus:
- Use another syringe to represent the rectum and anus. Attach it to the end of the large intestine tubing.
- Secure it to the cardboard base.
Adding Functional Elements:
- Simulating Food Movement:
- Fill the syringes with colored water (representing food and digestive juices). You can use different colors to show different stages of digestion.
- Use the syringes to push the colored water through the tubing, simulating the movement of food from the mouth through the esophagus, stomach, small intestine, large intestine, and out through the rectum and anus.
- Peristalsis Simulation:
- Use rubber bands or string to slightly constrict the tubing at regular intervals. This will help simulate the peristaltic movement of the digestive system when you push the syringes.
Final Touches:
- Labeling:
- Clearly label each part of the digestive system on the cardboard base. Include additional labels for parts like the liver, pancreas, and gallbladder if you want to represent their roles (though not part of the tubing).
- Details and Enhancements:
- Add more details like digestive enzymes and their effects at various points (using small labels or drawings).
- You can use more small syringes to represent the secretion of digestive juices (e.g., gastric juices in the stomach, bile from the liver).