
Creating a working model of the Pythagorean theorem using LED lights is a creative way to demonstrate the relationship between the sides of a right-angled triangle.
Here’s a step-by-step guide to build this model.
Materials Needed:
- Cardboard (for the base and triangle)
- Three LED lights (different colors, e.g., red, green, and blue)
- Battery (9V or coin battery for the LEDs)
- Wires (to connect the LEDs to the battery)
- Resistors (to protect the LEDs, 220Ω or 330Ω recommended)
- Switch (optional, to turn the LEDs on and off)
- Glue or tape
- Scissors
- Ruler
- Marker/Color pens (to label sides)
- Paper or foam (to build the triangle)
Video Steps for Creating the Model:
1. Prepare the Base
- Cut a large square piece of cardboard to serve as the base.
- On this base, draw a right-angled triangle using a ruler, labeling the sides: the hypotenuse (c) and the two legs, a and b.
2. Construct the Triangle
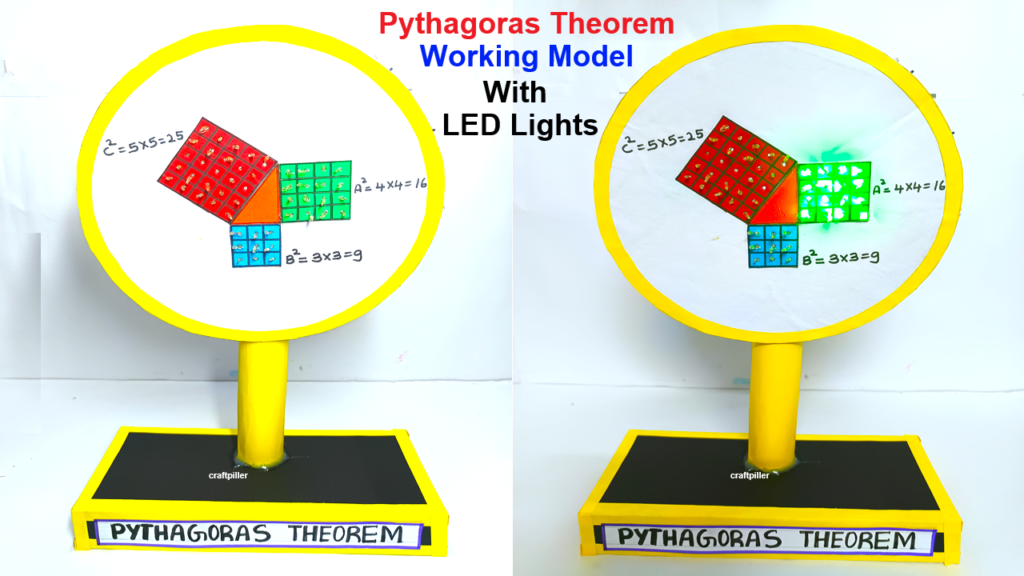
- To better visualize the Pythagorean theorem, you can make squares on each side of the triangle.
- Cut three square pieces from cardboard or paper:
- The first square should have sides of length equal to a (one leg).
- The second square should have sides of length equal to b (the other leg).
- The third square should have sides of length equal to c (the hypotenuse).
- Place these squares next to their corresponding sides of the triangle on the base, making it visually clear that the areas of squares a and b add up to square c.
3. Install the LED Lights
- LED 1 (for side a): Attach a red LED along the side labeled a (one leg).
- LED 2 (for side b): Attach a green LED along the side labeled b (the other leg).
- LED 3 (for side c): Attach a blue LED along the hypotenuse.
Ensure each LED is securely glued or taped to the sides of the triangle, with its legs free for wiring.
4. Connect the LEDs to the Battery
- For each LED, connect the longer leg (anode) to a positive wire from the battery, and the shorter leg (cathode) to a negative wire.
- Place a resistor between the positive wire and the LED to prevent excess current.
- You can use a breadboard if you want more flexibility in wiring, but simply soldering or twisting the wires can also work.
5. Connect the LEDs in a Circuit
- You can wire the LEDs in parallel, meaning each LED has its own connection to the power source. This ensures all LEDs get equal power.
- If you want to control the lights individually, add a switch for each LED. Otherwise, all LEDs will light up together when you connect the battery.
6. Demonstrate the Pythagorean Theorem
- Turn on the LEDs using the battery.
- The red and green LEDs along sides a and b represent the squares of these two sides.
- The blue LED on the hypotenuse represents the square of side c.
- Visually, the glowing of the lights highlights that the sum of the areas of the squares on sides a and b equals the area of the square on the hypotenuse (side c), representing a2+b2=c2a^2 + b^2 = c^2a2+b2=c2.
7. Label the Model
- Clearly label the sides of the triangle with a, b, and c.
- Optionally, write the Pythagorean theorem equation, a2+b2=c2a^2 + b^2 = c^2a2+b2=c2, next to the triangle to reinforce the concept.