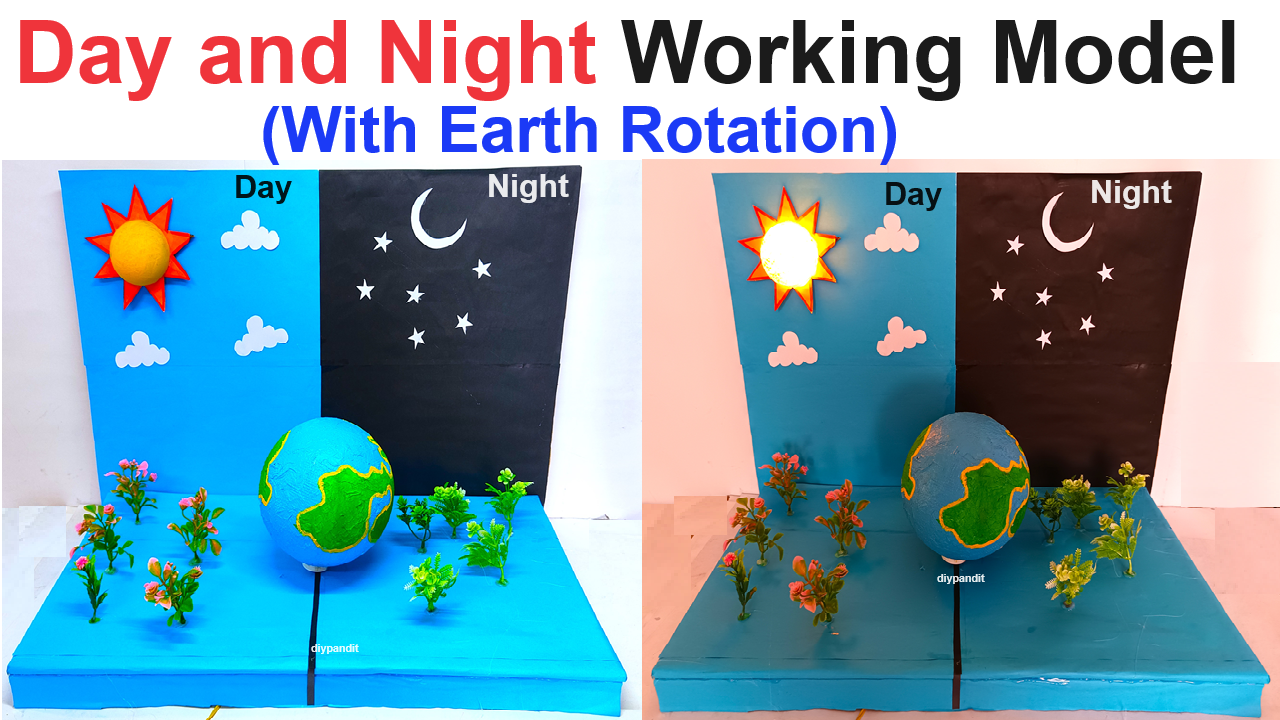
Creating a working model of the day and night cycle with a rotating Earth for a science exhibition project is a fantastic idea.

Here’s a step-by-step guide to help you make this model using cardboard, an LED light for the Sun, paper moon and stars, a ball for the Earth, a slow-running motor, and artificial plants.
Materials Needed:
- Large piece of cardboard (for the base)
- LED light (for the Sun)
- Ball (for Earth)
- Slow rotating motor with battery pack and switch
- Colored paper (for moon, stars, and decoration)
- Artificial plants
- Glue
- Scissors
- Markers
- Small battery holder and batteries
- Insulated wire
- Soldering iron and solder (optional, for secure connections)
- Hot glue gun or strong adhesive
- Ruler
- String (optional for additional support)
Steps by Steps Video instructions:
1. Prepare the Base:
- Cut the Cardboard Base: Cut a large rectangular piece of cardboard to serve as the base (about 60 cm x 40 cm).
- Cover with Colored Paper: Cover the cardboard base with colored paper using glue to make it visually appealing. You can use a light blue color to represent the sky.
2. Prepare the Earth:
- Paint the Ball: Paint the ball to resemble Earth, with blue for the oceans and green/brown for the continents.
- Attach to Motor: Secure the ball to the shaft of the slow rotating motor. Ensure the connection is strong and balanced to prevent wobbling when the model rotates.
3. Set Up the Sun:
- LED Light for Sun: Attach the LED light to the base or a stand so it is positioned to shine on the Earth.
- Connect the LED: Connect insulated wires from the LED light to the battery holder. Use a switch to control the power. Solder the connections if necessary.
4. Create the Moon and Stars:
- Paper Moon and Stars: Cut out a moon and stars from colored paper. The moon can be a white or light gray circle, and the stars can be yellow.
- Attach to Base: Glue the moon and stars to the background of the base or hang them from strings above the model to create a night sky effect.
5. Prepare the Artificial Plants:
- Day Plants: Attach artificial plants to the part of the base where the LED light will shine, representing daytime.
- Night Plants: Attach different artificial plants or use dark-colored plants on the opposite side of the base to represent nighttime.
6. Set Up the Rotating Mechanism:
- Mount the Motor: Secure the slow rotating motor to the center of the cardboard base using screws or strong adhesive.
- Connect the Power: Connect the motor to the battery holder and switch using insulated wires. Solder the connections if needed.
- Test the Rotation: Insert batteries into the battery holder and test the motor. Ensure the Earth rotates smoothly and the Sun (LED light) shines on the Earth to create the day and night effect.
7. Final Assembly:
- Position the Earth: Ensure the Earth is positioned so that one half is illuminated by the LED light (day) and the other half is in shadow (night).
- Secure All Components: Double-check all connections and glue points to make sure everything is securely attached.
8. Add Labels and Explanations:
- Label the Model: Use markers or printed labels to indicate “Day” and “Night” on the base.
- Explanation: Include a brief explanation of how the Earth’s rotation causes day and night. You can write this on a piece of paper and attach it to the base.
This project will visually and interactively demonstrate the concept of day and night, making it an excellent addition to a science exhibition.