Aim of the Model
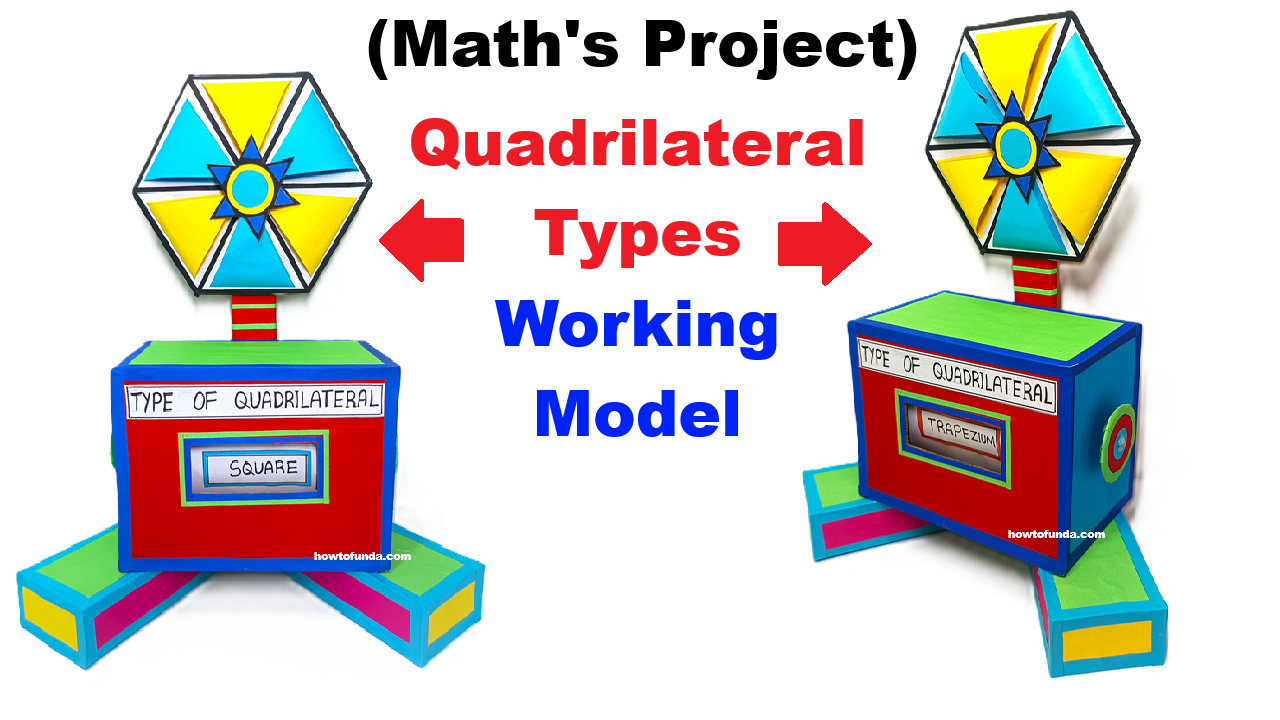
To demonstrate different types of quadrilaterals (Square, Rectangle, Rhombus, Parallelogram, Trapezium, Kite) using a rotating wheel mechanism and a sliding display window, making learning interactive and visual.

- Equal sides
- Parallel sides
- Equal angles
- Diagonals
Quadrilaterals Covered
- Square
- Rectangle
- Rhombus
- Parallelogram
- Trapezium
- Kite
STEP-BY-STEP CONSTRUCTION PROCESS
STEP 1: Making the Base Stand
- Cut a rectangular cardboard base (about 30 cm × 20 cm).
- Cover it neatly with colored chart paper.
- Create three rectangular legs (as shown in the image).
- Fix them under the base to give proper balance and height.
👉 This gives stability and makes the model attractive for exhibition.
STEP 2: Making the Main Box (Quadrilateral Display Box)
- Take a cardboard box (cube or cuboid shape).
- Cover it with red chart paper on all sides.
- On the front side, cut a small rectangular window.
- Paste a label above the window:
“TYPE OF QUADRILATERAL”
👉 This window will show the selected quadrilateral name.
STEP 3: Preparing the Sliding Name Strips
- Cut long cardboard strips (about 3–4 cm wide).
- On each strip, write one quadrilateral name:
- Square
- Rectangle
- Rhombus
- Parallelogram
- Trapezium
- Kite
- Cover strips with colored paper for smooth sliding.
- Insert these strips inside the box so that:
- Only one name appears in the window at a time
👉 This creates the working sliding effect.
STEP 4: Making the Rotating Quadrilateral Wheel
- Draw a hexagon or circular wheel on cardboard.
- Divide it into 6 equal sections.
- In each section, draw or paste:
- Square
- Rectangle
- Rhombus
- Parallelogram
- Trapezium
- Kite
- Color each section differently.
- Cut a small center hole.
- Fix the wheel using a split pin so it rotates freely.
👉 This wheel represents different quadrilateral shapes.
STEP 5: Connecting Wheel to Display Box
- Fix a vertical cardboard rod on top of the box.
- Attach the rotating wheel at the top of this rod.
- Ensure the wheel rotates smoothly without shaking.
👉 Now the model looks tall and eye-catching, just like in the image.
STEP 6: Linking Wheel Rotation to Sliding Display
- Behind the wheel, fix a pointer or tab.
- Connect this tab to the sliding strips using a cardboard guide.
- When the wheel rotates:
- The correct name strip moves
- The matching quadrilateral name appears in the window
👉 This is the main working principle of the model.
STEP 7: Labeling and Finishing Touches
- Add neat borders using colored tape.
- Write the project title on top:
“Quadrilateral Types – Working Model” - Add arrows showing rotation direction.
- Ensure smooth movement of:
- Wheel
- Sliding strips
HOW THE MODEL WORKS (EXPLANATION FOR JUDGES)
- The top wheel shows different quadrilateral shapes.
- When the wheel is rotated:
- A particular quadrilateral comes to the front.
- Simultaneously, the sliding mechanism moves.
- The correct quadrilateral name appears in the display window.
- This helps students visually match:
Shape ↔ Name ↔ Properties
EXAMPLE DEMONSTRATION
- Rotate the wheel to Square
👉 Display shows SQUARE - Rotate to Trapezium
👉 Display shows TRAPEZIUM - Rotate to Rhombus
👉 Display shows RHOMBUS
CONCLUSION
This Quadrilateral Types Working Model is a simple yet powerful teaching aid that transforms textbook geometry into an interactive learning experience. By rotating the wheel and observing the sliding display, students can clearly understand different quadrilateral shapes and their names in a fun and engaging way.