
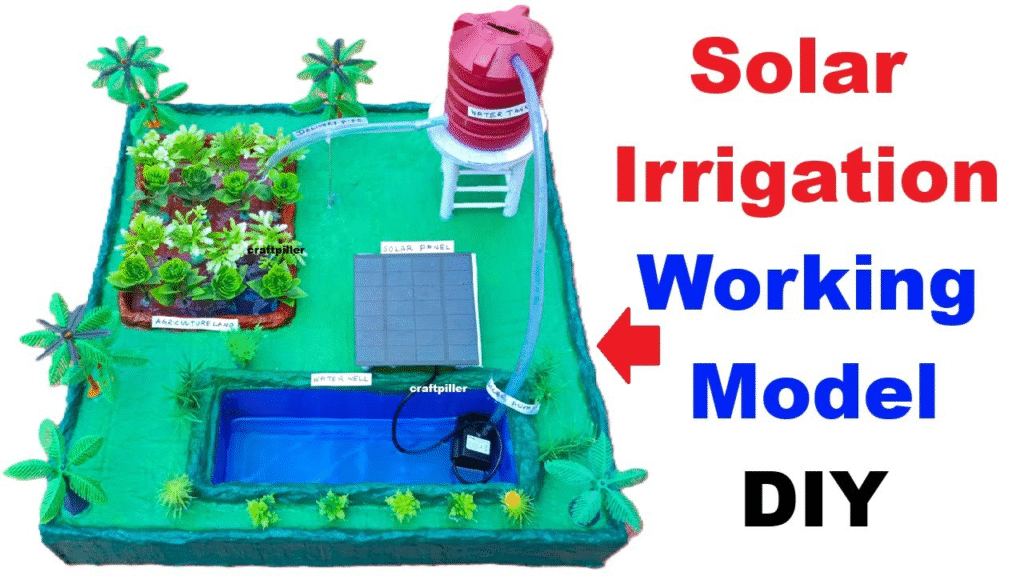
Welcome to this DIY Solar Irrigation Working Model — a perfect science project for exhibitions that demonstrates how solar energy can be used to power a water pump for efficient irrigation.
In this video, we show a step-by-step working model where:
- A solar panel powers a small DC pump.
- Water is delivered to plants through tubing and drip emitters.
- The model demonstrates efficient water use and renewable energy application.
What You Will Learn:
- How solar energy can power small irrigation systems.
- Construction of a miniature solar irrigation model for classroom or exhibition.
- How water is delivered efficiently through drip emitters.
- Understanding the basics of solar-powered systems and renewable energy.
STEP-BY-STEP BUILD
1. Plan your agriculture field layout
- Decide how many plants/pots you’ll water (3–8 works well for a table demo).
- Arrange plant positions on the base so tubing lengths are short and tidy.
- Place reservoir at a lower or same level as plants
- Place the over head tank next to reservoir.
2. Prepare the reservoir & pump
- Clean the container and fill ~¾ with water.
- Fit the mesh/strainer over the pump inlet (prevents clogging).
- Place the pump inside the reservoir. Secure it so it won’t move (hot glue or tape).
- Attach tubing to the pump outlet and send the output over head tank
3. Make the irrigation head tank & output from it
- Run the main tubing from pump outlet to over head tank .
4. Solar panel mounting & wiring
- Mount the solar panel on a small frame (cardboard or wood) so it can be tilted toward the sun. For an exhibition place it under a bright lamp or near a window.
- Connect panel positive (+) to a switch, then to the pump positive. Connect panel negative (−) to pump negative.
- (Optional) put a diode in series with the panel + to prevent reverse current at night.
- If using battery backup: place a small solar charge controller between panel and battery, and wire the pump to battery through a switch.
5. Mount the plants & hang tubing
- Place small potted plants or soil trays on the base.
- Position drip emitters directly above soil near the plant base. Secure tubing with tape or clips.
- Label each plant/emit line for the exhibition.
6. test the pump
- Turn the switch ON (or put the panel under bright light). Watch flow at each emitter.
- Adjust needle valves (or tighten/loosen holes) so each plant gets a small, steady drip — not a stream.