
Introduction
Water is one of the most important resources for life, but fresh water is limited and many areas face shortages. To solve this problem, two important methods are used: rainwater harvesting and water purification.
Rainwater harvesting means collecting rainwater and storing it for future use. The water is usually collected from rooftops or open areas and stored in tanks, ponds, or underground reservoirs. This helps to reduce dependence on rivers, lakes, and groundwater, especially during dry seasons.
Water purification is the process of removing dirt, germs, and harmful chemicals from water to make it safe for drinking. Methods like filtration, boiling, chemical treatment, and using filters can purify water. Purified water protects people from diseases like diarrhea, cholera, and typhoid.
Together, rainwater harvesting and water purification ensure a continuous supply of clean water. They are simple, effective, and important steps for saving water, protecting health, and conserving the environment.
This model shows how rainwater can be collected from rooftops, passed through a homemade filter using a syringe, and stored in a ground tank.It can then be used for daily household needs or watering plants, saving water and promoting sustainability.
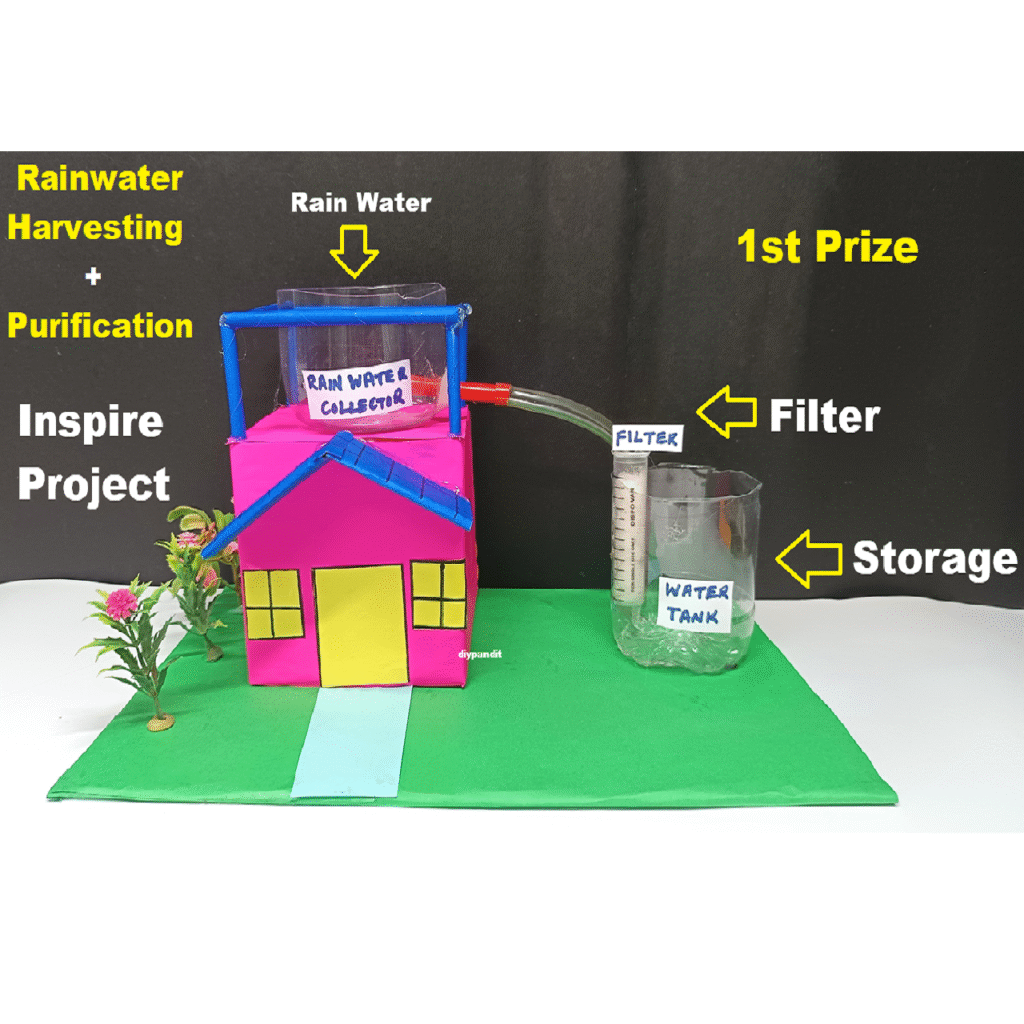
This setup is low-cost and effective for rural as well as urban areas.
Video Construction Steps:
Step 1: Build the House with Roof Catchment
- Use cardboard to make a small 3D house.
- Slope the roof slightly and add a plastic pipe or straw to simulate water outlet into bottle 1.
Step 2: First Plastic Bottle – Water Collector
- Cut the top of Bottle 1 and place it below the pipe.
- This bottle represents rainwater collected from the roof.
Step 3: Syringe Filter (Water Purification)
- Take a syringe, and fill it in this order:
- Bottom: Cotton
- Middle: Sand
- Top: Activated charcoal or fine gravel
- Connect the nozzle of syringe to a pipe leading into Bottle 2.
Step 4: Second Plastic Bottle – Water Storage Tank
- Bottle 2 (on ground level) stores filtered clean water.
- Place it slightly lower so gravity can allow water to flow through syringe filter.
- Optional: Add a small motor pump to draw water for irrigation/daily use.
Step 5: Show Usage of Water
- Use a pipe or straw to lead water from tank to a mini garden or plants (toy grass or actual small plants).
- Label the sections: “Rainwater”, “Filter”, “Purified Water”, “Used for Plants”.