AIM OF THE MODEL
The aim of the Math’s Park Working Model is to present different mathematics concepts in the form of a park, where each section represents a topic. This model helps students understand mathematics through visual learning, interaction, and real-life representation.

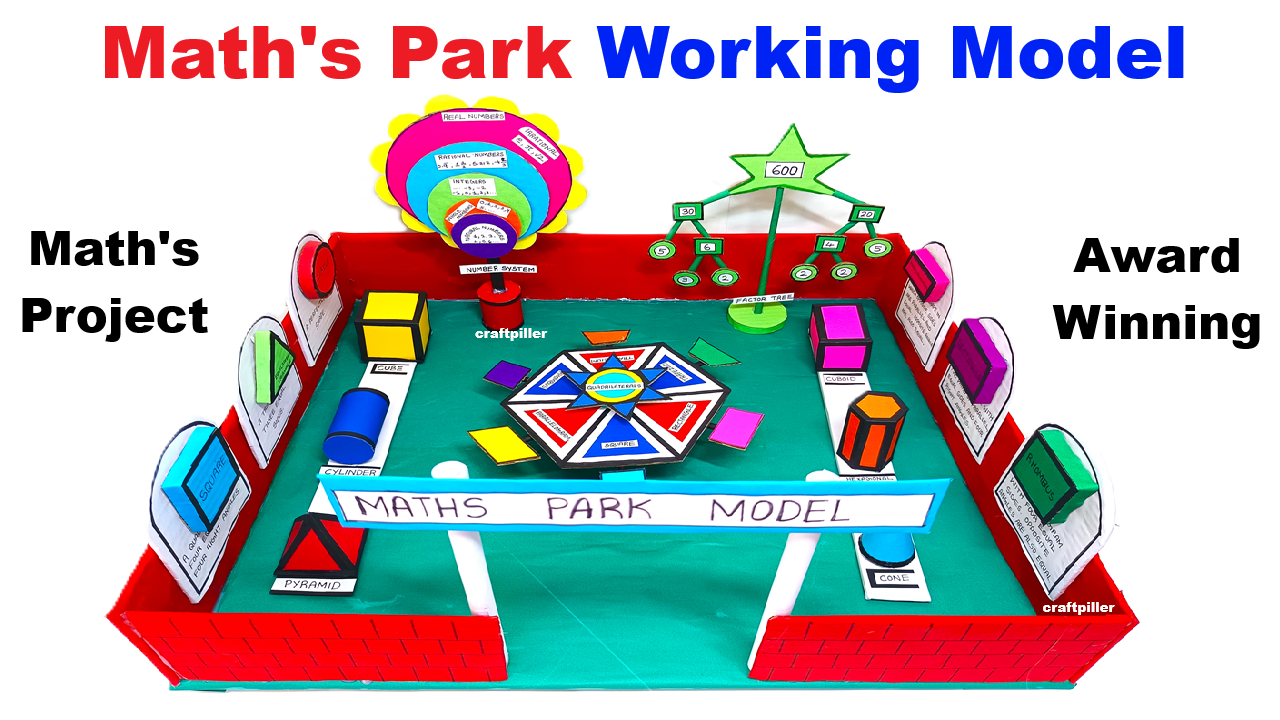
CONCEPTS COVERED IN THE MODEL
- Number System
- Quadrilateral Types
- Factor Tree
- 3D Shapes
- Solid Shapes
- Basic Geometry
MATERIALS REQUIRED
Base & Structure
- Thermocol sheet / thick cardboard (base)
- Cardboard boxes
- Color chart papers (green, red, blue, yellow)
- White paper rolls / straws (pillars)
Models & Shapes
- Cardboard for 3D shapes
- Foam sheets / colored paper
- Ice-cream sticks
- Split pins
Tools
- Scissors / cutter
- Fevicol / hot glue
- Sketch pens / markers
- Ruler
STEP-BY-STEP CONSTRUCTION PROCESS
STEP 1: Preparing the Base of Math’s Park
- Take a large thermocol or cardboard base.
- Cover it with green chart paper to represent grass in a park.
- Fix red boundary walls around the sides using cardboard strips.
- Draw or paste white pathway strips to give a park-like look.
👉 This forms the foundation of the Math’s Park.
STEP 2: Making the Entrance Gate
- Cut two vertical pillars using rolled white paper or cardboard tubes.
- Fix them at the front of the base.
- Place a horizontal strip on top.
- Write “MATHS PARK MODEL” clearly.
👉 This gives a realistic park entrance.
STEP 3: Central Quadrilateral Zone (Main Attraction)
- Cut a large octagon or circular board.
- Divide it into sections.
- Paste different quadrilateral shapes:
- Square
- Rectangle
- Rhombus
- Parallelogram
- Trapezium
- Color each section differently.
- Fix this in the center of the park.
👉 This acts as the main interactive learning zone.
STEP 4: Number System Flower Model
- Cut multiple circular layers of cardboard in decreasing sizes.
- Write:
- Natural Numbers
- Whole Numbers
- Integers
- Rational Numbers
- Real Numbers
- Fix all circles one above the other using a stick.
- Color them like petals of a flower.
- Place this model at the back center.
👉 This visually explains the number system hierarchy.
STEP 5: Factor Tree Model
- Cut a tree shape from cardboard.
- Write a number at the top (example: 600).
- Draw branches showing factorization.
- Fix it on a green circular base.
- Place it on one side of the park.
👉 This helps understand prime factorization easily.
STEP 6: 3D Shapes Section
- Make different 3D shapes using cardboard:
- Cube
- Cuboid
- Cylinder
- Cone
- Pyramid
- Color each shape neatly.
- Label each shape clearly.
- Fix them along the park pathways.
👉 Students can easily identify solid shapes.
STEP 7: Geometry & Shape Information Boards
- Cut small standing boards.
- Write short information about:
- Properties of shapes
- Faces, edges, vertices
- Fix them near the corresponding models.
👉 This acts like information boards in a real park.
STEP 8: Final Decoration & Finishing
- Add grass patches using green paper.
- Use bright colors for attraction.
- Ensure all labels are neat and readable.
- Check stability of each component.
CONCLUSION
The Math’s Park Working Model is an innovative and creative way to represent mathematical concepts in a real-life theme. By combining learning with visualization, this model helps students understand maths easily and develops interest in the subject. It is ideal for exhibitions, competitions, and classroom demonstrations.