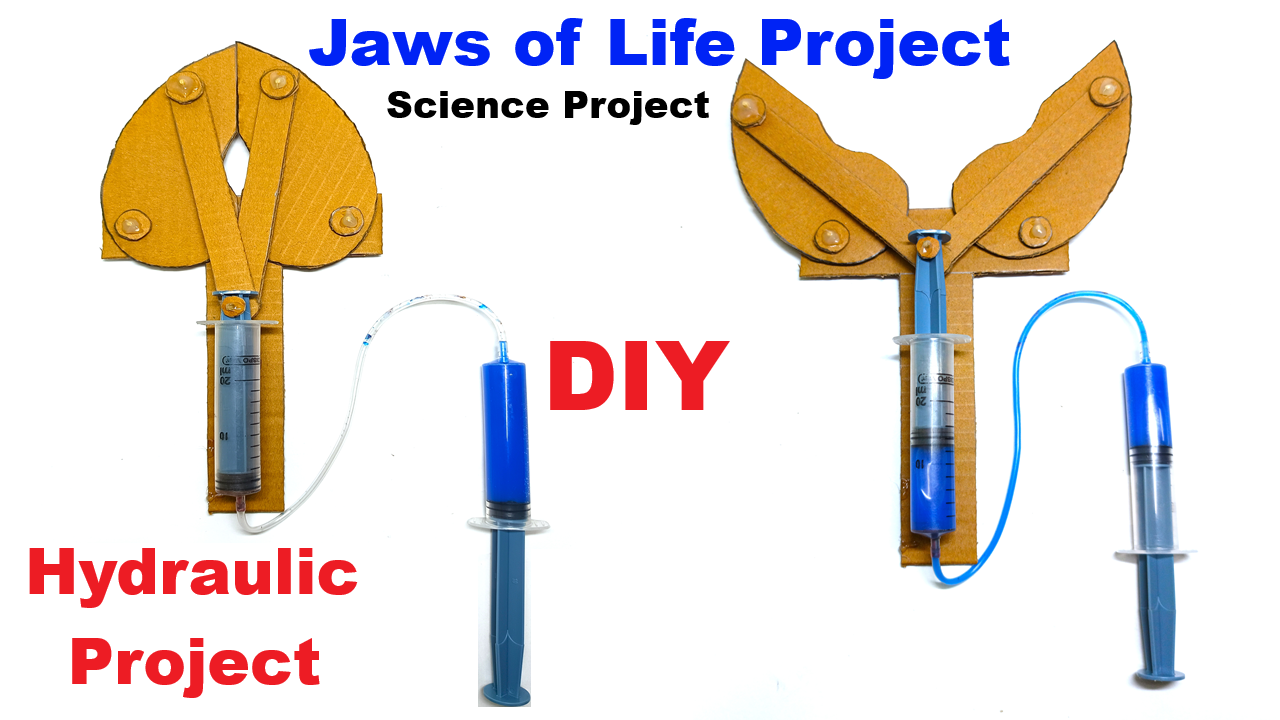
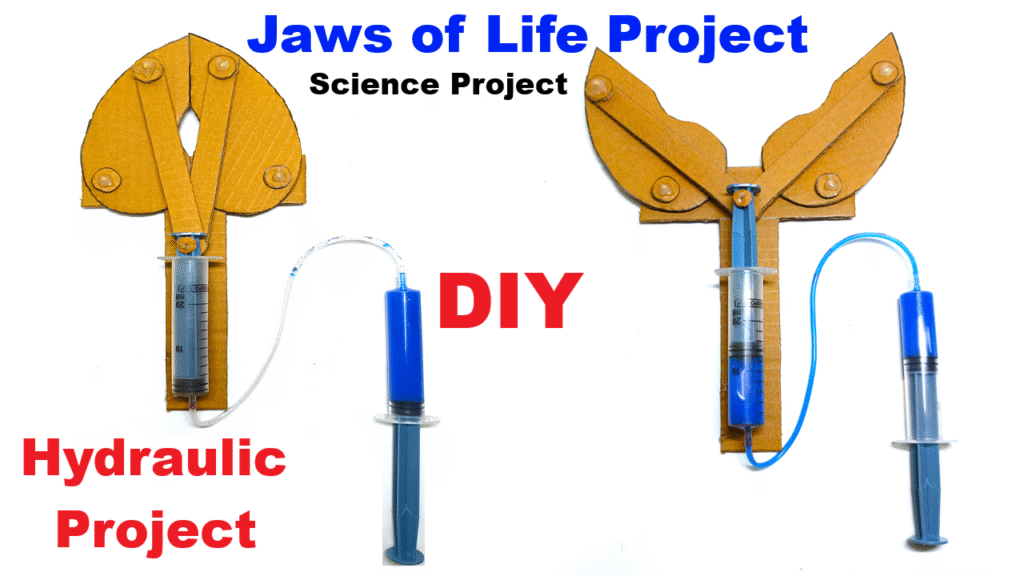
The Jaws of Life is a hydraulic rescue tool used by emergency workers to cut or lift vehicles during accident rescues.
Your model will demonstrate how hydraulic pressure can move mechanical arms to lift or spread objects using syringes and water.
MATERIALS REQUIRED
| Item | Quantity | Description |
|---|---|---|
| Cardboard | As needed | Thick (for arms and base) |
| Syringes | 4 (two pairs) | 10 ml or 20 ml syringes (2 for the model, 2 as hand pumps) |
| Plastic tubing | 1–2 meters | To connect syringe pairs (tight-fitting) |
| Water | As needed | Hydraulic fluid substitute |
| Glue gun / Fevicol | – | For strong joints |
| Cutter / scissors | – | For cutting cardboard |
| Ruler & pencil | – | For measurements |
| Paint / markers | – | For decoration and labeling |
| Small nuts/bolts (optional) | – | For pivot joints (can use toothpicks also) |
WORKING PRINCIPLE
The Jaws of Life work on Pascal’s Law of Hydraulics:
“Pressure applied to a fluid in a closed system is transmitted equally in all directions.”
When you press one syringe, the water pressure transfers through the tube to the connected syringe — pushing its piston out.
This hydraulic motion opens or closes the jaws, mimicking how real rescue tools lift or cut metal.
STEP-BY-STEP CONSTRUCTION GUIDE
Step 1: Make the Base
- Cut a rectangular base (about 25 cm × 15 cm) from thick cardboard.
- This will hold the entire model steady.
- Label one side as the hydraulic control area where your hand syringes will sit.
Step 2: Create the Jaws
- Cut two long cardboard arms (about 20 cm each).
- Shape the ends like jaws (curved or pointed).
- Join both arms at one end with a pivot — use a small toothpick, bolt, or straw piece as a hinge so the arms can open and close like scissors.
Tip: Strengthen the jaws with extra cardboard layers for rigidity.
Step 3: Connect the Hydraulic System
You’ll need two sets of syringes connected with plastic tubing and filled with colored water for visibility.
For Each Pair:
- Connect one syringe (the input/pump) to another syringe (the output/actuator) using tubing.
- Fill both syringes and the tube with water — make sure no air bubbles remain (they reduce pressure efficiency).
- Fix the output syringe on one jaw arm (use tape or glue).
- Attach its piston rod end to the other jaw arm using a small cardboard link.
- When the output syringe piston extends, it opens the jaws.
- When it retracts, the jaws close.
Step 4: Fix the Pump Syringes
- Mount the two input syringes (pumps) on the baseboard near the front edge.
- Label them as “Hydraulic Pump 1” and “Hydraulic Pump 2.”
- Connect each pump to its respective output syringe on the jaws.
Step 5: Test the Motion
- Push both pump syringes forward — the water pressure will extend the output syringes, making the jaws open.
- Pull both pumps back — the output syringes will retract, making the jaws close.
SCIENCE CONCEPT EXPLAINED
- Pascal’s Law: The hydraulic pressure applied at one point in a confined fluid is transmitted equally to all parts.
- Mechanical Advantage: A small force on the pump syringe produces a large force at the output syringe due to difference in area.
- Energy Conversion: Manual force → Hydraulic pressure → Mechanical motion.