
This project will demonstrate hydroponics, a method of growing plants without soil, using waste bottles, pipes, a DC water pump, a 9V battery, switch, plastic tray, color paper, and a glue gun.
The model will simulate how plants can grow in a water-based system, providing a real-life application of modern agricultural techniques.
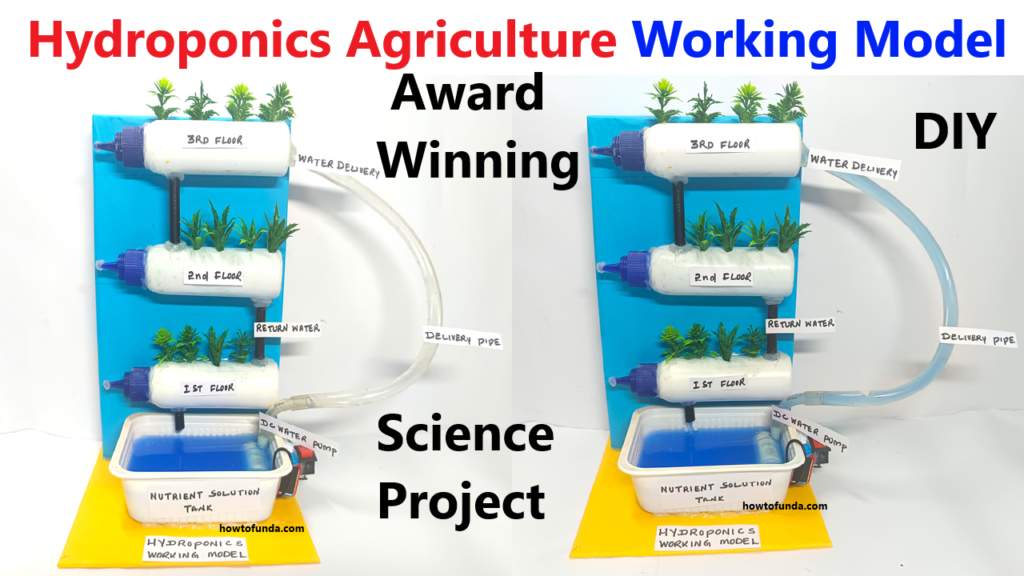
Materials Required:
Waste Bottles (for creating planters or reservoirs)
PVC Pipe or Flexible Tube (for water flow system)
DC Water Pump (to circulate water)
9V Battery (for powering the pump)
Switch (to control the water pump)
Plastic Tray (for holding the plants and the hydroponic setup)
Color Paper (for decoration)
Glue Gun (for assembling)
Water
Hydroponic Nutrients (optional, for plant growth)
Scissors, Tape, and Markers
Steps to Make the Model:
1. Prepare the Plastic Bottles for Plant Holders
- Take waste bottles (plastic soda bottles work well).
- Cut the bottles in half. The bottom half will be used as the plant holder and the top half will act as the reservoir (water storage).
- Cut small holes in the bottle caps large enough for the plants’ roots to fit through. These will hold the plants.
- Optionally, you can cover the bottom part of the bottle with color paper or paint to decorate the model and make it visually appealing.
2. Set Up the Water Delivery System
- Attach PVC pipes or flexible tubes between the bottles to allow water to flow from the reservoir to the plant holders.
- Ensure that the pipes are securely attached using glue or tape.
- The water pump should be connected at the bottom of the reservoir (waste bottle). Make sure the pump’s output is connected to the pipe that feeds the water into the plant bottles.
3. Attach the Water Pump and Wiring
- Connect the DC water pump to the 9V battery with a switch in between. This will allow you to control when the water is pumped through the system.
- Place the DC pump into the bottom of the waste bottle (the water reservoir).
- Ensure that the pump is positioned well in the bottle and is submerged in water.
- Wire the pump to the switch and 9V battery so you can turn the pump on and off to simulate water circulation.
- Once connected, you can test the pump to make sure it is pushing water through the pipes to the plant holders.
4. Assemble the Plastic Tray for Support
- Place a plastic tray on the base of the setup to catch any excess water and provide stability to the whole hydroponics system.
- Ensure that the tray is large enough to hold all the bottles in place.
- You can decorate the tray with color paper for a more attractive appearance.
5. Fill the Planter Bottles
- Fill the bottom half of the plastic bottles with small rocks or gravel to support the plant roots. This provides structure and allows the plants to stay upright.
- Alternatively, you can use hydroponic growth medium if available, which is often made from materials like perlite or clay pellets.
6. Test the Water Circulation
- Once the plants are set up, turn on the water pump using the switch. The pump should circulate the water from the reservoir through the pipes into the planters, where the plants’ roots can take in water and nutrients.
- Check for any leaks in the water system and make sure the flow of water is even.