In this article we writing the detailed steps on making of hibiscus flower parts 3d model for school science exhibition project diy at home using cardboard and color paper

Creating a 3D model of a hibiscus flower using color paper and cardboard is a creative and educational project.
Here’s a step-by-step guide to making a simple hibiscus flower parts model:
Materials you’ll need:
- Cardboard or thick cardstock (for the base and flower components)
- Colored paper (various colors for different flower parts)
- Scissors
- Glue or adhesive tape
- Markers or colored pens (optional, for additional details)
Step-by-step process:
- Prepare the base:
- Cut out a rectangular or square piece of cardboard or thick cardstock to serve as the base for your hibiscus flower parts model. The size can vary depending on how detailed you want the model to be.
- Identify the flower parts:
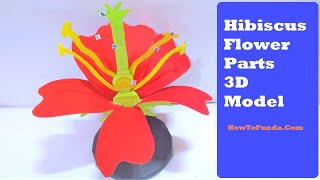
- Research and identify the different parts of a hibiscus flower, such as the petals, stamens, pistil, sepals, and stigma. You can use textbooks or online resources for reference.
- Create the flower components:
- Use colored paper to cut out shapes representing each part of the hibiscus flower. For example, large, colorful petal shapes, thin strips for stamens, pistil shapes, and small rounded pieces for the stigma and sepals. Remember, this is a simplified representation, not an anatomically precise model.
- Assemble the model:
- Glue or tape the paper cutouts representing each flower part onto the cardboard base. Arrange them in their correct positions to resemble a hibiscus flower. For example, place the petals in a circular formation, then add the stamens, pistil, sepals, and stigma in their appropriate locations.
- Use markers or colored pens to add additional details and labels to the hibiscus flower parts model. You can label each flower part with its name and add lines or shading to create depth and realism.
This simple model effectively demonstrates the basic parts of a hibiscus flower and helps learners understand their arrangement and functions.
#hibiscusflower3dmodel #diy #craftPiller #scienceproject #scienceexhibition #sciencemodel #botany #biologymodel #botanymodel #sciencefair