
how the eye forms an image of an object and sends this information to the brain:
- Spotting an Object:
- When you look at something, your eyes notice the object. It could be a toy, a book, or anything else.
- Light from the Object:
- Light from that object enters your eyes. Imagine it like a beam of light coming from the object and entering your eyes.
- Focusing the Light:
- Your eye has a transparent front part called the cornea and a lens inside. They work together to focus the incoming light, just like a camera lens focusing on a subject.
- Image on the Retina:
- The focused light forms an image on the back of your eye, on a special surface called the retina. It’s similar to a picture being projected onto a screen.
- Special Cells Activate:
- On the retina, there are tiny cells called rods and cones. When the light hits them, they create electrical signals. Think of them as messengers carrying information about the object.
- Signals Traveling:
- These electrical signals travel through the optic nerve, a sort of pathway that connects your eyes to your brain. It’s like a cable carrying the messages.
- Journey to the Brain:
- The optic nerve carries these signals to your brain. They travel to an area at the back of your brain called the visual cortex.
- Brain Decoding:
- In the visual cortex, the brain decodes these signals. It’s like the brain understands the language of the signals and turns them into a mental picture.
- Recognizing the Object:
- The brain uses its incredible abilities to recognize what the object is. It could be a friend’s face, a favorite toy, or anything else.
- Creating Your Perception:
- Finally, based on all these processes, you perceive the object. You “see” it in your mind, and your brain interprets the visual information, allowing you to understand and recognize the object.
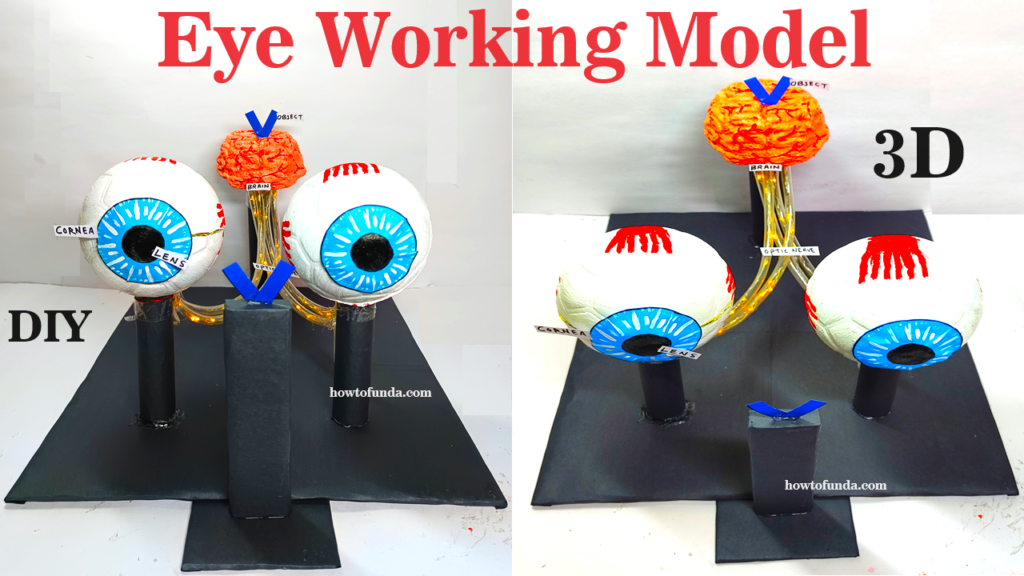
Creating a working model of the eye using balls, transparent pipes, serial lights, and representing the optic nerve and brain can be an engaging and educational project.
Here’s a simple guide on how you can build a basic model:
Materials needed:
- Two different-sized balls (representing the eyeball)
- Transparent pipe or tubing (to represent the optic nerve)
- LED lights or fairy lights (representing the optic nerve signals)
- Cardboard or a sturdy base
- Paints or markers (for detailing)
- Hot glue gun and glue sticks
- Craft knife or scissors
- Small box or container (for the brain)
Step by Step Working model Instructions:
- Prepare the eyeballs:
- Take the larger ball and cut it in half using a craft knife.
- Paint or draw the details of the eye on the cut surface, such as the iris, pupil, and sclera.
- Repeat the process with the smaller ball, but you can keep it whole to represent the other eye.
- Create the optic nerve:
- Cut a length of transparent pipe to represent the optic nerve. The length can vary based on your design preference.
- Secure one end of the pipe to the back of one of the eyeballs using hot glue.
- Attach LED lights:
- Place LED lights or fairy lights inside the transparent pipe to represent the signals traveling through the optic nerve.
- Secure the other end of the pipe to the back of the second eyeball using hot glue.
- Build the base:
- Create a base for your model using cardboard or any other sturdy material. This will serve as the support for the eyes and the optic nerve.
- Secure the eyeballs on the base in a way that they resemble the positioning of human eyes.
- Represent the brain:
- Take a small box or container and paint or decorate it to represent the brain. You can add details like the cerebrum, cerebellum, and brainstem.
- Place the box on the base, connecting it to the other end of the transparent pipe to symbolize the connection between the eyes and the brain.
- Connect the lights:
- Connect the LED lights to a power source, ensuring that the lights simulate the transmission of signals from the eyes to the brain.
- Final touches:
- Add any additional details or decorations to enhance the overall appearance of your eye model.