Electric lifts play a crucial role in improving vertical mobility and accessibility in buildings, contributing to the efficiency and convenience of modern living and workspaces.
An electric lift is a mechanical device designed to raise or lower objects vertically using an electric motor as the power source.
Electric lifts are commonly used in various applications, ranging from industrial settings to residential and commercial buildings.
They provide a convenient and efficient means of transporting goods or people between different levels within a structure.
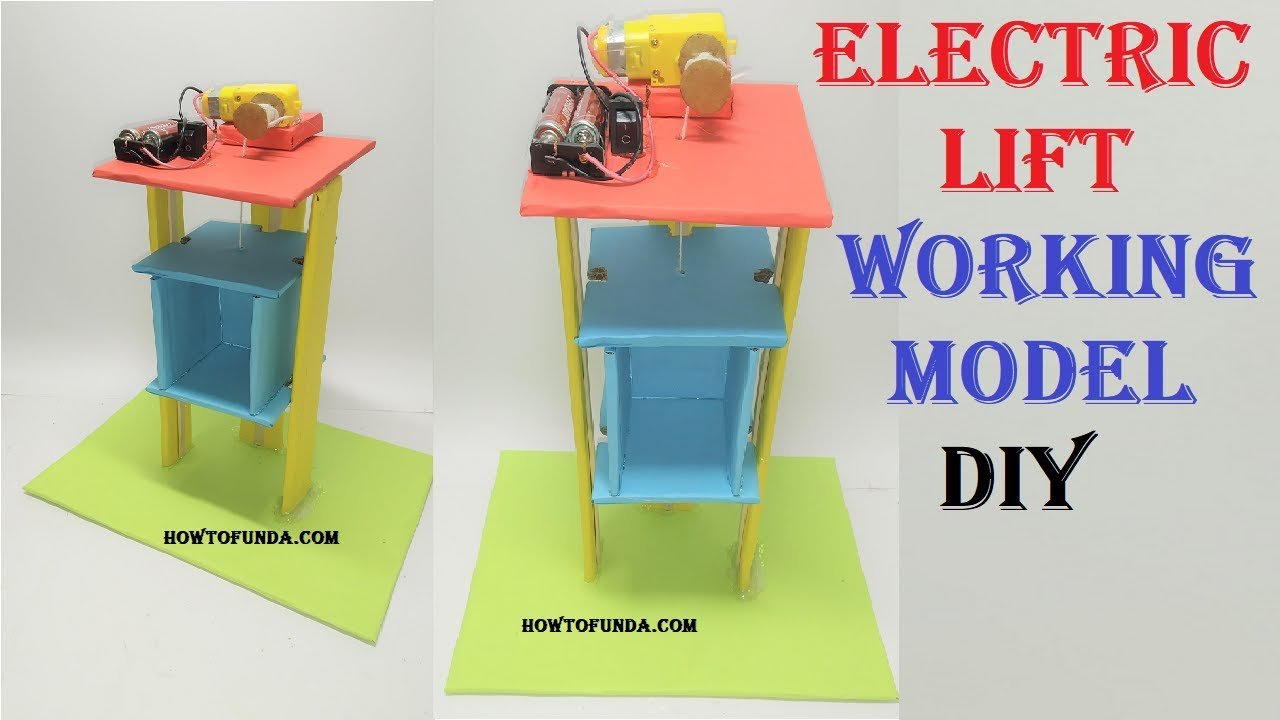
This simple electric lift model demonstrates the basic principles of a lifting system powered by a DC motor.
It’s a great way to showcase mechanical concepts and electrical components in a hands-on and interactive manner for a science exhibition.

Electric lift working model making
Creating an electric lift working model for a science exhibition using a DC motor, battery, cardboard, and thread can be a fun and educational project.
Below is a step-by-step guide to help you build a simple electric lift model:
Materials Needed:
- Cardboard sheets or a sturdy box
- DC motor with a pulley or gear
- Thread or thin string
- Battery pack or power source
- On/Off switch
- Craft materials (markers, paint, stickers, etc.)
- Wooden or plastic dowels
- Glue
- Small platform or basket for the lift
- Wires
- Hot glue gun
Steps:
- Prepare the Base:
- Use cardboard sheets or a sturdy box to create the base of the lift. This will serve as the structure that holds the motor and the lifting mechanism.
- Attach the DC Motor:
- Attach the DC motor to the base using hot glue or other suitable adhesive. Ensure that the motor is securely fixed in place.
- Create the Lifting Mechanism:
- Connect a pulley or gear to the shaft of the DC motor. This will be the mechanism that raises and lowers the lift platform.
- Construct the Lift Platform:
- Create a small platform or basket using cardboard. This platform will be lifted by the motor. Attach the platform to the thread or string.
- Thread the String:
- Thread the string or thread through the pulley or gear attached to the motor. Connect the other end of the string to the lift platform, ensuring it is securely tied.
- Install Switch and Battery:
- Attach an on/off switch to the battery pack or power source. Connect the wires from the switch to the terminals of the DC motor. Ensure proper polarity.
- Secure the Battery Pack:
- Secure the battery pack to the base using glue or other fastening methods. Make sure it is easily accessible for turning the lift on and off.
- Decorate and Customize:
- Use craft materials to decorate the lift and make it visually appealing. You can paint the base, add labels, or use stickers to make it look like a miniature elevator.
- Assemble the Supporting Structure:
- Use wooden or plastic dowels to create a supporting structure around the lift. This will add stability and help guide the lift platform as it moves up and down.
- Test the Electric Lift:
- Turn on the switch, and observe how the lift platform moves up and down. Troubleshoot any issues with the string or pulley mechanism if needed.
- Adjustments and Improvements:
- Make any necessary adjustments to ensure the smooth operation of the lift. You can experiment with different gear ratios or pulley sizes for variations in speed and lifting capacity.
- Prepare for Presentation:
- Create a brief explanation or presentation to accompany your electric lift model. Explain the science behind the lift, the role of the motor, and how the lifting mechanism works.