Introduction to Earth Resources
Earth resources are the diverse materials, substances, and ecosystems found on our planet that are vital for sustaining life and supporting human civilizations. These resources can be categorized into several main types, each playing a unique role in the functioning of Earth’s ecosystems and meeting the needs of human societies.
Types of Earth Resources:
- Renewable Resources:
- These are resources that can be naturally replenished within a relatively short period, making them sustainable for the long term. Examples include sunlight, wind, water, and biomass. Renewable resources play a crucial role in maintaining ecological balance and providing essential services like energy production.
- Non-renewable Resources:
- Non-renewable resources are finite and cannot be replaced within human timescales. Examples include fossil fuels like coal, oil, and natural gas, as well as certain minerals like gold and uranium. These resources are valuable but need to be managed responsibly to ensure their availability for future generations.
- Biotic Resources:
- Biotic resources are derived from living organisms, including both plants and animals. They encompass forests, fisheries, crops, and wildlife. These resources provide food, shelter, and materials for various human activities.
- Abiotic Resources:
- Abiotic resources are non-living elements found in the environment. They include minerals, metals, rocks, and elements like air and water. Abiotic resources are essential for industries, construction, and various technological applications.
- Atmospheric Resources:
- The Earth’s atmosphere, composed primarily of nitrogen, oxygen, carbon dioxide, and other gases, is a critical resource for all life forms. It provides the air we breathe, regulates climate patterns, and protects against harmful solar radiation.
- Hydrospheric Resources:
- The hydrosphere encompasses all water bodies on Earth, including oceans, rivers, lakes, and groundwater. Water resources are vital for drinking, agriculture, industry, and supporting aquatic ecosystems.
- Lithospheric Resources:
- The lithosphere consists of the Earth’s solid outer layer, which includes minerals, rocks, and geological formations. These resources are crucial for construction, manufacturing, and energy production.
- Ecosystem Services:
- Ecosystems provide a wide range of services, including air and water purification, pollination of crops, climate regulation, and natural hazard mitigation. These services are essential for human well-being and the functioning of the planet.
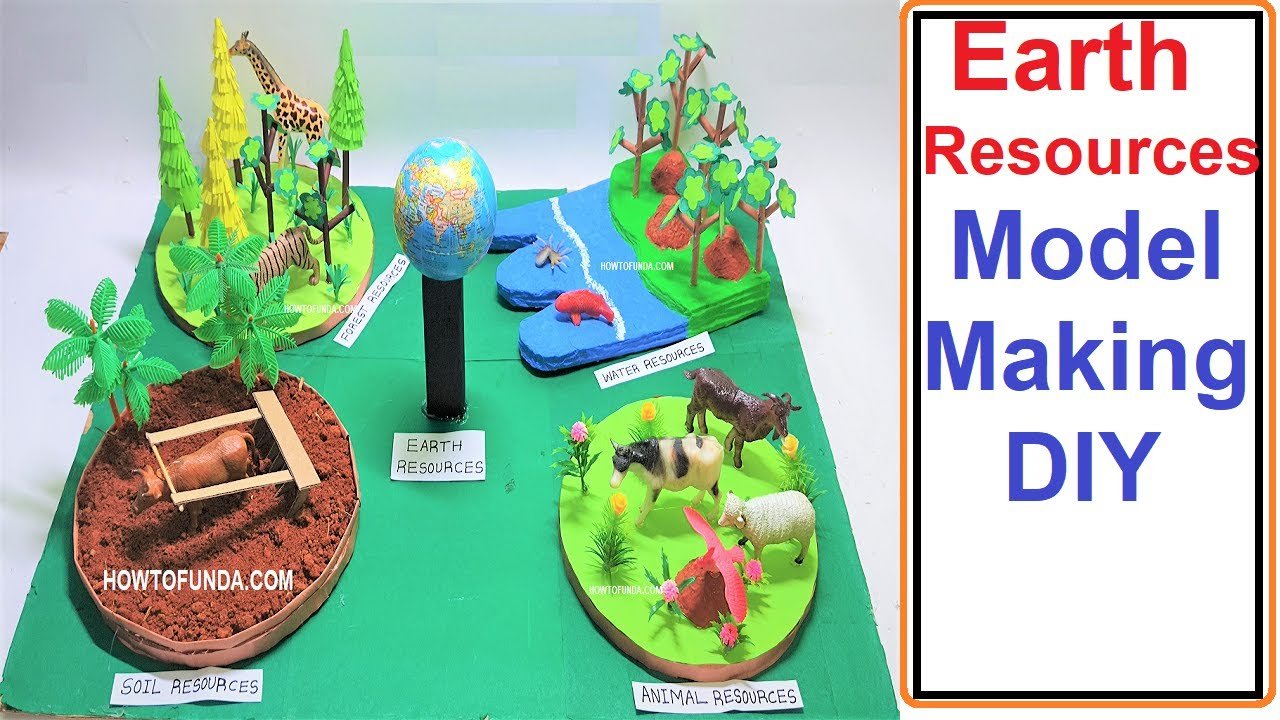
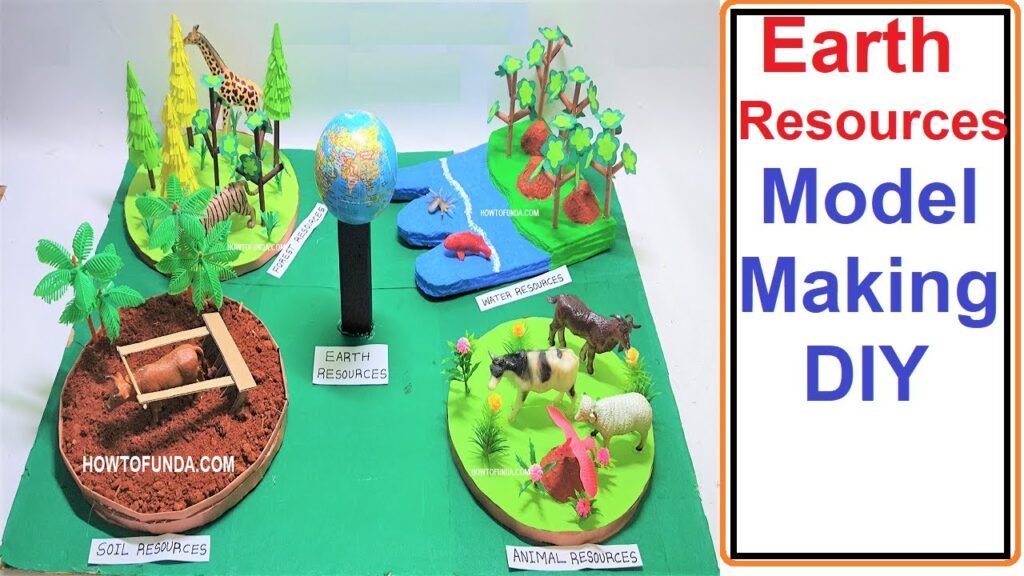
Creating an Earth Resource Model is a great way to visually represent the various types of resources found on our planet. Here’s a step-by-step guide to help you create one:
Materials Needed:
- Styrofoam or cardboard (for the base)
- Colored paper, paint, or markers
- Small objects or images representing different types of resources (e.g., miniature trees for forests, small rocks for minerals, toy animals for wildlife)
- Labels or markers
- Glue, scissors, and tape
Steps:
1. Prepare the Base:
- Use a large piece of styrofoam or cardboard as the base for your model. This will serve as the foundation on which you’ll create the Earth Resource Model.
2. Identify Resource Zones:
- Decide which resource zones you want to include in your model. These could include forests, water bodies, mineral deposits, agricultural areas, and urban regions.
3. Representing Forests:
- Use small, realistic-looking trees or cut-out images of trees to represent forests. Arrange them in a designated forest zone on your model. You can also use green-colored paper to create a 3D effect.
4. Depicting Water Bodies:
- Use blue-colored paper or paint to represent water bodies like rivers, lakes, and oceans. You can also use small pebbles or beads to represent bodies of water. Arrange them in their respective zones.
5. Displaying Mineral Deposits:
- Use small rocks, pebbles, or painted clay pieces to represent mineral deposits. Arrange them in areas where minerals are commonly found (e.g., mountains or underground).
6. Showcasing Agricultural Areas:
- Use small figures or cut-out images of farmers and crops to represent agricultural areas. Arrange them in zones where agriculture is prominent.
7. Representing Urban Areas:
- Use small buildings, toy cars, or cut-out images of buildings to represent urban areas. Arrange them in zones where cities and towns are located.
8. Wildlife and Biodiversity:
- Use small toy animals or images of wildlife to represent biodiversity. Place them in areas where natural habitats are found.
9. Adding Labels:
- Label each resource zone to clearly identify the types of resources it represents.
10. Informational Labels:
- Add small labels or cards with brief explanations of each type of resource. This provides educational value to your model.
11. Finishing Touches:
- Add any additional details or decorations to make your model visually appealing. You can use paint or colored paper to enhance the overall look.
12. Presentation:
- When presenting your model, explain each resource zone and its importance in our daily lives. Discuss how we use and rely on these resources.
By creating this model, you’ll have a tangible representation of the various types of resources found on Earth and a better understanding of their significance in our environment and daily lives.