The purpose of creating a working model of Earth’s layers is to provide a tangible representation of the Earth’s composition and structure.
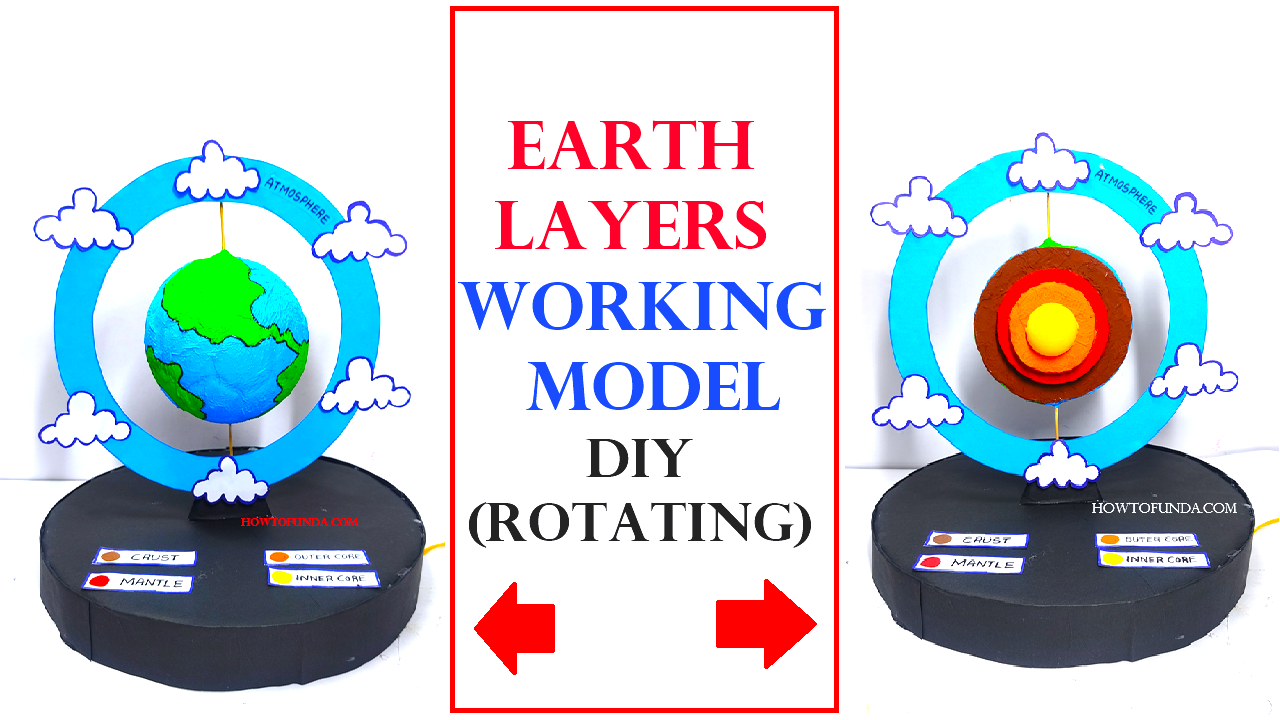
This model helps learners visualize and comprehend the different layers that make up our planet, including the crust, mantle, outer core, and inner core, and understand their characteristics and interactions.
Creating a working model of the Earth’s layers with a rotating Earth and an outer circle representing the atmosphere is a fascinating project.
Here’s a step-by-step guide to help you build this model for your science exhibition:

Materials Needed:
- Cardboard: For the base, Earth’s layers, and atmosphere
- DC motor: To rotate the Earth
- Battery: To power the DC motor
- Switch: To control the motor
- Wires: For connecting the motor, switch, and battery
- Glue: Hot glue or strong adhesive
- Scissors/Cutter: For cutting cardboard
- Paints/Markers: For coloring and labeling the layers
- Ruler: For measurements
- Styrofoam ball: To represent the Earth
- Wooden stick or metal rod: To act as an axle for the Earth to rotate
- Paper or thin plastic sheet: For the outer circle representing the atmosphere
- Stand: To support the model (can be made from cardboard or other sturdy material)
Step by Step Video Instructions on earth layers working model:
1. Prepare the Base:
- Cut a large rectangular piece of cardboard for the base (about 12×12 inches).
- Ensure the base is sturdy enough to support the entire model.
2. Prepare the Earth:
- Take the styrofoam ball and paint it to represent the Earth’s surface.
- Divide the ball into sections representing the crust, mantle, outer core, and inner core. Use different colors to differentiate each layer.
- Mark and label each layer clearly.
3. Attach the Axle:
- Insert the wooden stick or metal rod through the center of the styrofoam ball. This will act as the axle for rotation.
- Ensure the rod is secure and centered.
4. Attach the Motor:
- Fix the DC motor to the base using glue or a motor holder.
- Attach one end of the rod (axle) to the motor’s shaft. Ensure the connection is secure so that the motor can rotate the Earth smoothly.
5. Create the Outer Circle (Atmosphere):
- Cut a large circular piece from the paper or thin plastic sheet to represent the atmosphere. The diameter should be larger than the Earth.
- Paint and label this circle to show different layers of the atmosphere (troposphere, stratosphere, mesosphere, thermosphere, and exosphere).
- Attach this circle to the base around the Earth using small cardboard supports.
6. Connect the Electrical Components:
- Connect the DC motor to the battery and switch using wires.
- Ensure all connections are secure and test the switch to make sure the motor runs smoothly and rotates the Earth.
7. Assembly:
- Position the Earth and atmosphere correctly on the base.
- Secure all parts using glue.
- Make sure the Earth rotates without obstruction and the atmosphere circle remains stable.
8. Finishing Touches:
Add any additional labels or decorations to enhance the visual appeal of the model.Test the model to ensure everything works as intended.