In this project we write about making of the drip irrigation working model for science exhibition – diy – science project – simple using waste materials available at home
#dripirrigation #workingmodel #scienceproject #scienceexhibition #sciencefair #workingproject #agriculture #agriculturemodels

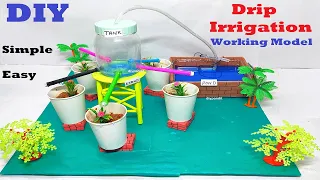
Creating a drip irrigation working model using a plastic bottle, drip pipes from waste sketch pen barrels, a DC motor pump, a switch, a 9V battery, and a water tank on a stand made from cardboard and paper is an excellent project.
Here’s how to build it:
Materials Needed:
- Plastic bottle (for the water tank)
- Waste sketch pen barrels (for drip pipes)
- DC motor pump
- 9V battery and battery connector
- Small switch
- Wires and connectors
- Cardboard and paper (for the stand)
- Scissors
- Hot glue gun or strong adhesive
- Small plants or simulated plants
- Plastic tray (to hold plants and collect excess water)
- Drill or sharp tool (to make holes in the bottle and sketch pen barrels)
- Ruler
- Marker or pen
Step by Step Guide to Make the Drip irrigation working model
1. Prepare the Base and Stand
- Base Preparation:
- Use a plastic tray to hold the plants. This tray will also collect excess water from the irrigation system.
- Create the Stand:
- Cut and assemble cardboard to create a sturdy stand for the plastic bottle (water tank). The stand should elevate the bottle high enough to allow gravity to assist with water flow.
- Reinforce the stand with additional cardboard pieces if necessary to ensure it is stable.
2. Prepare the Water Tank
- Modify the Plastic Bottle:
- Drill a small hole near the bottom of the plastic bottle to attach the drip pipes. Make sure the hole is just big enough to fit the sketch pen barrels snugly.
- Attach the Drip Pipes:
- Cut the sketch pen barrels to the desired length for the drip pipes. Insert one end of each barrel into the hole in the plastic bottle.
- Secure the connections with hot glue to prevent leaks.
3. Set Up the Drip System
- Position the Drip Pipes:
- Arrange the drip pipes so they extend from the plastic bottle to the base of each plant in the plastic tray. Ensure that the pipes are evenly spaced and reach all six plants.
- You can drill small holes along the length of each sketch pen barrel to simulate drip emitters.
- Connect the DC Motor Pump:
- Place the DC motor pump in a well or container of water. Attach a piece of plastic tubing to the pump’s output and run it to the plastic bottle (water tank).
- Use hot glue or tape to secure the tubing in place.
4. Electrical Connections
- Connect the Battery and Switch:
- Connect the DC motor pump to the 9V battery using wires. Include a switch in the circuit to control the pump.
- Solder the connections if necessary to ensure a secure electrical connection.
- Test the System:
- Fill the plastic bottle with water and place it on the stand.
- Turn on the switch to activate the DC motor pump. Water should be pumped from the well into the plastic bottle and then flow through the drip pipes to the plants.
5. Final Assembly and Detailing
- Secure All Parts:
- Ensure all components are securely attached and there are no leaks in the system.
- Add any additional decorations or labels to make the model more informative and visually appealing.
- Demonstrate the Model:
- Explain how drip irrigation works and its benefits for water conservation.
- Show how the system delivers water directly to the roots of the plants, minimizing water waste and ensuring efficient irrigation.
By following these steps, you can create a functional and educational drip irrigation working model that demonstrates the principles of efficient water use in agriculture.