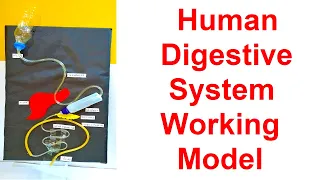
In this post we write about making of the digestive system working model for science exhibition project diy at home using waste materials

Creating a digestive system working model using a plastic bottle and pipes is an engaging and educational project.
This model will demonstrate the process of food digestion as it moves through the digestive system.
Here’s a step-by-step guide to making a simple digestive system working model:
Materials you’ll need:
- Plastic bottle (empty and clean)
- Pipes or tubes (transparent or semi-transparent, such as PVC pipes or straws)
- Colored paper (for organs)
- Scissors
- Glue or adhesive tape
- Markers or colored pens (optional, for additional details)
Step-by-step process:
- Prepare the plastic bottle:
- Cut the bottom part of the plastic bottle to create an opening large enough for the pipes to fit through. This will serve as the “mouth” of the digestive system.
- Identify the organs:
- Research and identify the major organs of the digestive system, such as the esophagus, stomach, small intestine, and large intestine. You can use textbooks or online resources for reference.
- Create the organ components:
- Use colored paper to cut out shapes representing each organ. For example, long and narrow tubes for the esophagus and intestines, and a larger round shape for the stomach. Remember, this is a simplified representation, not an anatomically precise model.
- Arrange the organs:
- Insert the pipes through the opening at the bottom of the plastic bottle to represent the digestive tract. Place the organs (colored paper cutouts) along the pipes in their correct order. For example, the esophagus leading to the stomach and then to the intestines.
- Connect the pipes:
- Use adhesive tape to securely connect the pipes and hold the organs in place along the digestive tract.
- Create a “food” prop:
- Cut out small pieces of colored paper or use small beads to represent the “food.” You can place these pieces at the “mouth” of the digestive system and demonstrate how they move through the digestive tract as you tilt the model.
- Use markers or colored pens to add additional details and labels to the digestive system model. You can label each organ with its name and add arrows to indicate the direction of food movement.
- Once your digestive system working model is complete, you can use it as a visual aid to learn about the process of digestion. You can demonstrate how food travels through the digestive tract, highlighting the role of each organ in breaking down and absorbing nutrients.
Remember, this is a simplified digestive system working model suitable for educational purposes and basic visualization.
#digestivesystemworkingmodel #scienceexhibition #craftpiller #digestivesystem #workingmodel #zoology #sciencefair #sciencemodel