In this post article we have written on how to make the animal and plant cell model making science project using cardboard simple and easy
#animalcellmodel #plantcellmodel #scienceproject #craftpiller #biologymodel #scienceproject #scienceexhibition #sciencefair

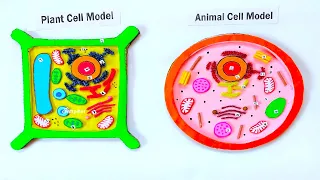
Creating animal and plant cell models using cardboard and color paper is an excellent way to understand the differences between these two types of cells and their structures.
Here’s a step-by-step guide to making both models:
Materials you will need:
- Cardboard (large piece for the base)
- Color paper (different colors for different cell organelles)
- Scissors
- Glue or adhesive
- Markers or pens (for adding details)
Step-by-step instructions for the animal cell model:
- Prepare the base:
- Take a large piece of cardboard to serve as the base for your animal cell model.
- Create the cell membrane:
- Use color paper to cut out a rounded shape representing the cell membrane. Glue it onto the cardboard to outline the cell.
- Add the cytoplasm:
- Use a light-colored paper to fill the inside of the cell membrane, representing the cytoplasm.
- Create the organelles:
- Use color paper to cut out shapes representing the various organelles found in an animal cell, such as the nucleus, endoplasmic reticulum, Golgi apparatus, mitochondria, lysosomes, and ribosomes.
- Position the organelles:
- Glue the organelle shapes onto the cytoplasm, placing them at their correct locations within the animal cell.
- Optional: Add labels and explanations:
- Use markers or pens to label the different organelles and include brief explanations of their functions.
Step-by-step instructions for the plant cell model:
- Prepare the base:
- Use the same cardboard base from the animal cell model.
- Create the cell wall:
- Use color paper to cut out a rectangular shape representing the cell wall. Glue it onto the cardboard to outline the plant cell.
- Add the cytoplasm:
- Use a light-colored paper to fill the inside of the cell wall, representing the cytoplasm.
- Create the organelles:
- Use color paper to cut out shapes representing the various organelles found in a plant cell, such as the nucleus, endoplasmic reticulum, Golgi apparatus, mitochondria, lysosomes, ribosomes, chloroplasts, and vacuole.
- Position the organelles:
- Glue the organelle shapes onto the cytoplasm, placing them at their correct locations within the plant cell.
- Optional: Add labels and explanations:
- Use markers or pens to label the different organelles and include brief explanations of their functions.
These models provide a visual representation of the structures and organelles found in animal and plant cells. It’s a fun and educational project to understand the differences between these two types of cells and how their specific organelles contribute to their functions.