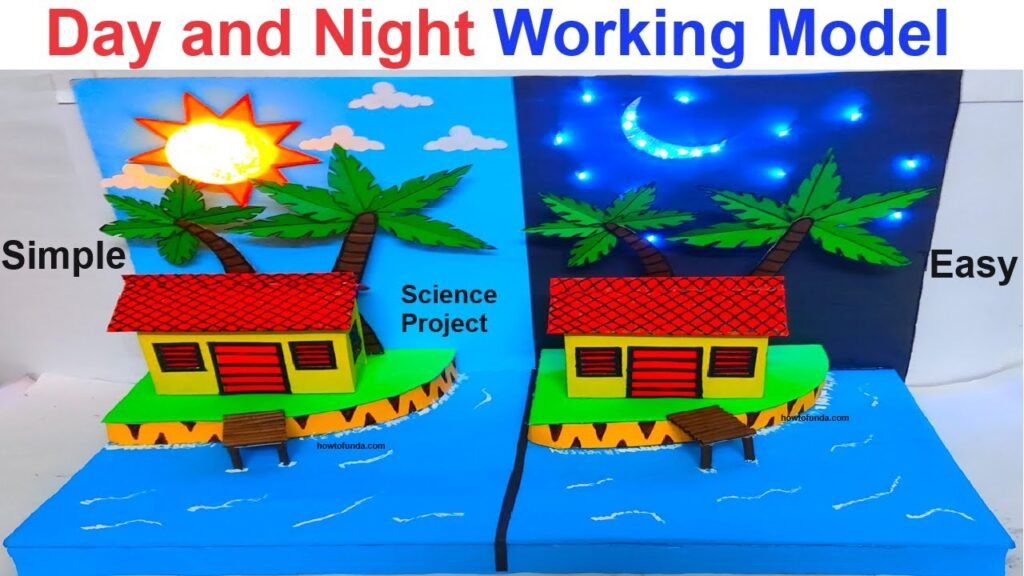
Creating a day and night working model with an innovative and awesome design for a science exhibition is a fantastic project. Here’s a step-by-step guide to help you build the model

Materials Needed
- Cardboard
- Color paper (blue, green, yellow, black, etc.)
- LED light
- Bulb cover
- Switch
- 9V battery
- Rice serial lights (for the moon)
- Coconut tree models or materials to craft them
- Glue
- Scissors
- Markers or paint
- Small house model or materials to craft one
Step-by-Step Video Instructions
1. Base and Background
- Base:
- Cut a large piece of cardboard to serve as the base of your model. Ensure it’s sturdy enough to support all the elements.
- Sea Background:
- Cover half of the base with blue color paper to represent the sea. You can add waves and details using markers or paint.
- Sky Background:
- For the daytime sky, use light blue color paper. For the nighttime sky, use black or dark blue color paper. Divide the background into two sections, one for day and one for night.
2. House Model
- Construct or place a small house model in the middle of the base. You can create the house using cardboard and color paper, adding details like windows, doors, and a roof.
3. Daytime Elements
- Sun:
- Use a small LED light for the sun. Cover it with a yellow bulb cover to diffuse the light and create a sun-like appearance.
- Connect the LED light to a switch and a 9V battery. Secure the battery and switch behind the background or under the base.
- Additional Daytime Details:
- Add clouds, trees, and other daytime features using color paper and markers.
4. Nighttime Elements
- Moon:
- Use rice serial lights to create a glowing moon. Arrange the lights in a circular shape and secure them in place. You can cover the lights with white or silver paper to enhance the moon-like appearance.
- Connect the rice lights to a switch and a 9V battery, similar to the sun setup.
- Stars:
- Add stars using glow-in-the-dark stickers or small LED lights.
- Additional Nighttime Details:
- Add details like nocturnal animals or night plants using color paper and markers.
5. Coconut Trees
- Create coconut trees using green and brown color paper. You can use twigs or rolled paper for the trunks and cut-out green paper for the leaves. Place these trees around the house and on the sea background to enhance the tropical feel.
6. Integration and Final Touches
- Ensure that all electrical connections are secure and safe. Hide the wiring as much as possible to maintain a clean look.
- Test both the sun and moon lights to make sure they work correctly when the switches are turned on and off.
- Add any additional decorations or details to make your model more realistic and appealing.
Display and Function
- Place the model in a location where you can easily access the switches.
- Demonstrate the transition between day and night by switching the sun and moon lights on and off.
- Explain the concept and design to viewers, highlighting the innovative elements and the science behind the day and night cycle.
By following these steps, you will create an engaging and visually appealing day and night working model that showcases your creativity and understanding of the concept.

