
The phases of the moon refer to the different illuminated portions of the moon as observed from Earth during its orbit around our planet. The moon goes through a cycle of eight primary phases, which repeat approximately every 29.5 days.
Here are the phases of the moon:
1. New Moon: During the new moon phase, the moon is located between the Earth and the Sun. The side of the moon illuminated by the Sun is facing away from us, making the moon appear completely dark and not visible from Earth.
2. Waxing Crescent: In this phase, a small portion of the moon’s right side (from the northern hemisphere’s perspective) starts to become illuminated by sunlight. It looks like a thin crescent shape, with the illuminated part growing larger each night.
3. First Quarter (Waxing Gibbous): During the first quarter, half of the moon is illuminated, and it appears as a half-moon shape. The right side of the moon is visible from the northern hemisphere.
4. Waxing Gibbous: In this phase, more than half but less than the full moon is illuminated. The illuminated portion continues to grow larger each night.
5. Full Moon: During the full moon, the entire side of the moon facing Earth is illuminated by sunlight, making it appear as a complete circle. The full moon is visible throughout the night.
6. Waning Gibbous: Following the full moon, the illuminated portion gradually decreases. The moon’s left side (from the northern hemisphere’s perspective) begins to wane, leading to a waning gibbous phase.
7. Last Quarter (Waning Gibbous): During the last quarter, half of the moon is illuminated, but this time it’s the left half. The left side of the moon is visible from the northern hemisphere.
8. Waning Crescent: In this phase, a small crescent of the moon’s left side is illuminated. The illuminated portion continues to shrink each night until the new moon phase begins again.
The phases of the moon are a result of the changing angles between the Earth, the moon, and the Sun. As the moon orbits Earth, different portions of its illuminated side become visible to us, leading to the cycle of phases we observe from Earth. This cycle repeats roughly every 29.5 days, known as the lunar month.
Creating a phases of the moon working model using plastic balls for different moon phases, an LED bulb as the sun, color paper, and cardboard is a creative way to understand the lunar phases.
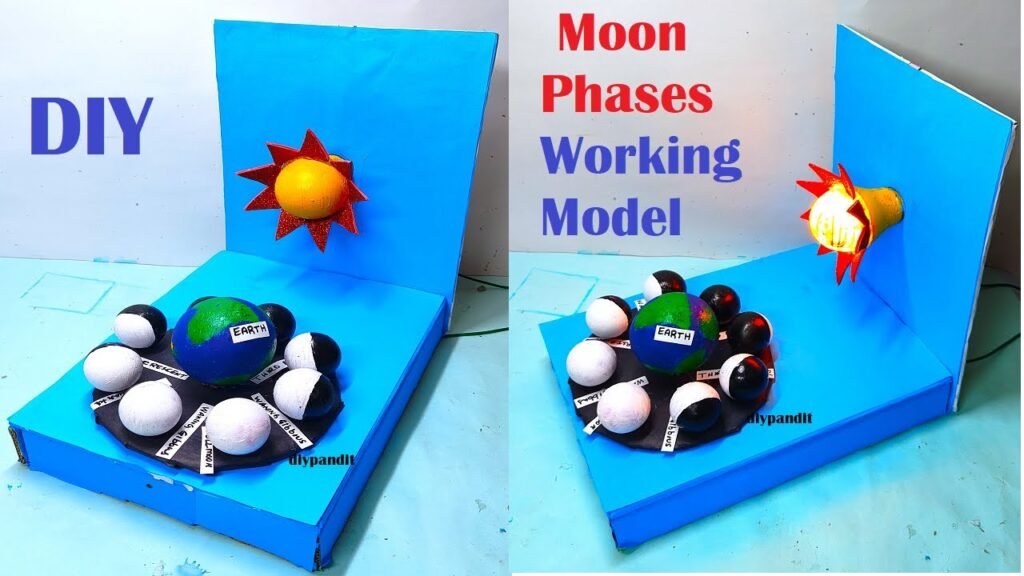
Here’s a step-by-step guide on how to build this model:
Materials You’ll Need:
- Plastic balls (different sizes or colors for moon phases)
- LED bulb (as the sun)
- Cardboard sheets (for the background)
- Color paper (for the moon’s surface)
- Craft knife or scissors
- Hot glue gun and glue sticks
- Craft supplies for decoration (markers, stickers, etc.)
- Small dowel or stick (for attaching the moon phases)
Steps to Build the phases of the moon working model:
- Prepare the Background:
- Cut a piece of cardboard to create the background of your model.
- You can paint or cover the cardboard with black paper to represent space.
- Create the Moon’s Surface:
- Cut circles of color paper to represent the moon’s surface.
- Use different shades of gray to simulate the various moon phases.
- Attach the Moon Phases:
- Attach the plastic balls representing the moon phases to the color paper circles.
- Arrange them in a line or curve to show the progression of lunar phases.
- Create the Sun:
- Attach an LED bulb to the background cardboard, near the top.
- The LED bulb represents the sun, which illuminates the moon phases.
- Attach the Stick or Dowel:
- Attach a small dowel or stick horizontally on the background, just below the moon phases.
- This will serve as the axis on which the moon phases will rotate.
- Rotate the Moon Phases:
- Attach the moon phases (with plastic balls) to the stick or dowel using hot glue.
- Make sure they’re evenly spaced and can rotate freely.
- Mark the Phases:
- On the background, label each moon phase (New Moon, First Quarter, Full Moon, etc.) next to its corresponding plastic ball.
- LED Illumination:
- When you turn on the LED bulb (representing the sun), the light will illuminate the moon phases, showing their different illuminated portions.
- Final Touches:
- Decorate the model with stars, labels, and other space-themed elements using craft supplies.
This model will help you visually understand how the moon’s appearance changes during its different phases as it orbits the Earth. It’s an engaging and educational way to learn about lunar cycles and astronomy.
phases of the moon related questions asked in science exhibition with answers
Question 1: What causes the different phases of the moon?
Answer: The changing relative positions of the moon, Earth, and the Sun cause the different phases of the moon. As the moon orbits Earth, we see different portions of its illuminated side due to the varying angles between these celestial bodies.
Question 2: Why does the moon appear to change shape throughout the month?
Answer: The moon’s appearance changes because of the varying amounts of sunlight that illuminate its surface. Depending on our line of sight, we see different parts of the moon illuminated or in shadow, leading to the phases.
Question 3: How does the new moon phase differ from the full moon phase?
Answer: During the new moon, the moon is positioned between the Earth and the Sun, with the dark side facing us. In contrast, during the full moon, the moon is on the opposite side of the Earth from the Sun, and its entire illuminated side is visible.
Question 4: What is the waxing phase of the moon?
Answer: The waxing phase refers to the period when the illuminated part of the moon is increasing. It starts with the new moon and progresses through the waxing crescent, first quarter, and waxing gibbous phases.
Question 5: How does the waning phase of the moon differ from the waxing phase?
Answer: The waning phase is the period during which the illuminated part of the moon is decreasing. It begins after the full moon and continues through the waning gibbous, last quarter, and waning crescent phases.
Question 6: What’s the importance of understanding the phases of the moon?
Answer: Understanding the phases of the moon is important for various reasons. It helps us predict moonrise and moonset times, plan lunar observations, and appreciate the changing night sky. It’s also a key aspect of ancient and cultural calendars.
Question 7: Can you explain the role of Earth’s shadow in the phases of the moon?
Answer: Earth’s shadow plays a role in the new moon and full moon phases. During a new moon, Earth’s shadow is cast on the moon’s far side, making it appear dark to us. During a full moon, Earth is between the moon and the Sun, and our shadow is cast on the moon’s surface.
Question 8: What is the approximate duration of the complete lunar cycle?
Answer: The complete lunar cycle, which includes all eight primary phases, lasts about 29.5 days, known as the lunar month.
Question 9: How do the phases of the moon affect Earth’s tides?
Answer: The gravitational pull of the moon and the Sun on Earth’s oceans causes tides. During the new moon and full moon phases (syzygy), the gravitational forces are aligned, leading to higher high tides (spring tides) and lower low tides. During the first and last quarter phases (quadrature), tides are less extreme (neap tides).
Question 10: Can you explain the significance of the crescent and gibbous phases?
Answer: The crescent phases (waxing crescent and waning crescent) show a thin, illuminated crescent of the moon. The gibbous phases (waxing gibbous and waning gibbous) display a large, illuminated portion, but it’s not fully round like the full moon.