
Introduction to Lever Physics:
Levers are simple but powerful devices that have been used by humans for ages to lift heavy objects, move things, and create balance.
Understanding lever physics can give you insights into how these everyday tools work. Let’s explore the world of levers in simpler terms:
Understanding Levers:
- What is a Lever?
- A lever is essentially a rigid rod or bar that can pivot, called the fulcrum. You use levers when you push down on one end (effort), causing the other end to lift something (load).
- Parts of a Lever:
- There are three main parts to a lever:
- Fulcrum: The point where the lever pivots.
- Effort: The force applied to move the lever.
- Load: The object being lifted or moved.
- There are three main parts to a lever:
Types of Levers:
- First-Class Lever:
- In a first-class lever, the fulcrum is between the effort and the load. Think of a seesaw or a crowbar. When you push down on one end (effort), the other end (load) moves.
- Second-Class Lever:
- In a second-class lever, the load is between the fulcrum and the effort. Imagine a wheelbarrow. When you lift the handles (effort), the load inside the wheelbarrow goes up.
- Third-Class Lever:
- In a third-class lever, the effort is between the fulcrum and the load. Picture a fishing rod. When you pull the handle (effort), the fishing line (load) moves.
Lever Physics:
- Force and Distance:
- Levers allow you to use less force to lift or move an object. By applying force over a longer distance, you can lift a heavy load with less effort.
- Mechanical Advantage:
- Levers provide a mechanical advantage. This means you can lift a heavy load with less force than it would take without the lever.
- Balance and Stability:
- Levers help balance forces. They distribute the force applied, making it easier to lift or move objects while maintaining stability.
Real-Life Examples:
- Seesaw:
- A seesaw at the playground is a classic example of a first-class lever. When one person pushes down (effort) on one end, the other end (load) goes up.
- Nutcracker:
- A nutcracker is a second-class lever. The nut is placed between the fulcrum and where you squeeze (effort), making it easier to crack.
- Baseball Bat:
- A baseball bat is a third-class lever. The handle is the effort, and when you swing it, the load is the baseball moving in the opposite direction.
Why Levers Matter:
- Efficiency:
- Levers make tasks more efficient by allowing you to lift or move heavy loads with less force.
- Everyday Tools:
- Many everyday tools, from scissors to door handles, use lever principles to make our lives easier.
- Physics Understanding:
- Learning about levers introduces you to essential physics concepts like force, distance, and mechanical advantage in a practical way.
3D working model of Levers
Creating a 3D working model of a seesaw weighing balance for a lever science project can be a fun and educational endeavor.
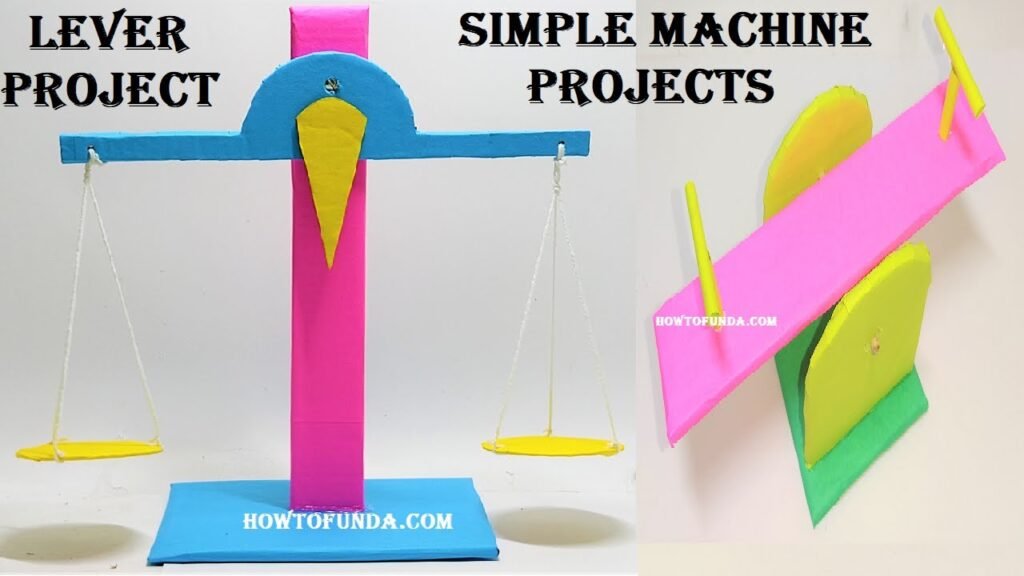
Here’s a step-by-step guide to help you build a simple and effective seesaw balance:
Materials Needed:
- Wooden board or sturdy cardboard (for the base)
- Wooden dowels or sticks
- Small containers or cups (for the platforms)
- Small objects or weights
- Ruler
- Pencil
- Craft knife or scissors
- Hot glue gun or strong adhesive
- Paints and brushes (optional for decoration)
- Measuring tape
- String or rope
Video step by step Procedure lever science project(simple machine) working model 3d | seesaw – weighing balance:
1. Prepare the Base:
- Cut a rectangular piece of wood or cardboard to serve as the base of your seesaw balance. This will be the platform on which the lever system is built.
2. Create the Seesaw Beam:
- Cut a wooden dowel or stick to serve as the seesaw beam. The length will depend on the size of your base. Attach it to the base near one end using a hot glue gun or adhesive.
3. Add Platforms:
- Attach small containers or cups to each end of the seesaw beam. These will serve as the platforms for placing objects to be weighed.
4. Balance the Seesaw:
- Adjust the positions of the containers until the seesaw is balanced horizontally. This is your initial balanced position.
5. Mark the Center of Mass:
- Mark the center of mass on the seesaw beam. This point should be directly above the point where the seesaw pivots.
6. Attach a Pointer (Optional):
- Attach a small pointer or arrow to the center of mass mark. This can be a thin dowel or stick with an arrow-shaped indicator at the end.
7. Decorate (Optional):
- Decorate your seesaw balance with paints and brushes. You can add colors, labels, or creative designs.
8. Experiment with Weights:
- Place different weights or objects on one side of the seesaw and observe how it tilts. Use this to demonstrate how the seesaw measures the relative weights of different objects.
9. Discuss the Principles:
- Explain to observers that the seesaw balance is a type of lever where the weight on one side affects the balance of the system.
10. Experiment with Positions: – Experiment with placing weights at different distances from the pivot point and observe the changes in balance. Discuss the concept of torque and the effect of distance on the lever arm.
11. Secure Pivot Point: – Ensure that the seesaw pivot point is stable and securely attached to the base.
Conclusion:
Levers are like magic tools that help us move things with less effort. Whether you’re using a seesaw at the park or opening a door, understanding the physics of levers shows how simple machines can make our daily tasks much easier.