In this post we write about making of rain detector working model for science exhibition – diy – inspire award science project
#raindetector #workingmodel #scienceproject #scienceexhibition #diypandit #inspireaward #inspireawardproject

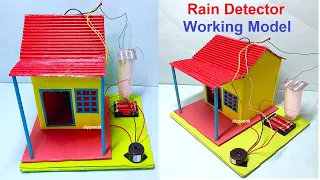
Creating a rain detector using cardboard involves a simple yet effective design that mimics a house roof. This DIY project uses basic materials like cardboard, a battery, blades, and an alarm to create a functional rain detection system. Here’s a step-by-step guide to help you make a rain detector using cardboard:
Materials Needed:
- Cardboard sheets
- Battery (9V)
- Blades or conductive material (e.g., aluminum foil)
- Buzzer or small alarm
- Wires
- Insulating material (e.g., tape or non-conductive adhesive)
- Glue
- Craft knife or scissors
- Ruler
- Marker
- Small container or support for the roof (optional)
Step by step video guide making of rain detector working model:
1. Design the House Roof:
- Draw and cut out the shape of a simple house roof from a piece of cardboard. This will be the main structure of your rain detector.
2. Create the Blades:
- Cut thin strips of cardboard to act as the blades. Attach these strips diagonally across the roof, leaving spaces in between. These spaces will allow rainwater to fall through.
3. Make the Conductive Surface:
- Cover the blades with a conductive material such as aluminum foil. Ensure that each blade is fully covered with the foil. This conductive surface will help detect raindrops.
4. Attach the Wires:
- Connect wires to the conductive material on the blades. You can use tape or glue to secure the wires in place.
5. Connect to the Battery:
- Connect the wires to the battery. One wire should be connected to the positive terminal of the battery, and the other to the negative terminal.
6. Attach the Buzzer or Alarm:
- Connect the other ends of the wires to the buzzer or alarm. This creates a circuit so that when raindrops complete the conductive path between the blades, the buzzer is activated.
7. Insulate the Connections:
- Use insulating material such as tape or non-conductive adhesive to cover any exposed connections, ensuring that the wires do not touch each other.
8. Optional Support:
- If you want to elevate the rain detector, you can place it on a small container or support structure to simulate a raised roof.
9. Test the Rain Detector:
- Pour water over the roof, ensuring that it falls onto the blades. The rainwater completing the conductive path should activate the buzzer, indicating that rain is detected.
10. Make Adjustments:
- Fine-tune the design by adjusting the spacing between the blades or experimenting with different blade materials to optimize the rain detection sensitivity.