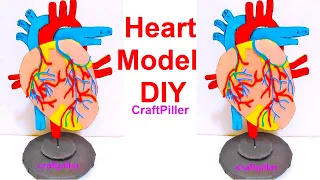
In this post I have given detailed steps on how to make the heart model with stand for science fair project using cardboard and color paper

Creating a heart model using cardboard and color paper is an excellent way to understand the basic anatomy and structure of the human heart.
Here’s a step-by-step guide to making the model:
Materials you will need:
- Cardboard (for the base and heart)
- Color paper (different colors for different parts of the heart)
- Scissors
- Glue or adhesive
- Markers or pens (for adding details)
- Ruler (optional, for precise measurements)
Step-by-step instructions:
- Prepare the base:
- Take a large piece of cardboard to serve as the base for your heart model.
- Draw and cut out the heart shape:
- Use a ruler and a pencil to draw a heart shape on the cardboard. The heart shape should be symmetrical and resemble the human heart.
- Cut out the heart shape from the cardboard using scissors.
- Create the atria and ventricles:
- Use color paper to cut out shapes representing the atria and ventricles of the heart.
- Glue the atria (two upper chambers) and ventricles (two lower chambers) onto the appropriate positions on the heart shape.
- Add the major blood vessels:
- Use color paper to cut out shapes representing the major blood vessels connected to the heart, such as the superior vena cava, inferior vena cava, pulmonary artery, and aorta.
- Glue these blood vessel shapes onto the heart model, making sure they connect to the correct chambers.
- Create the heart valves:
- Use color paper to cut out small shapes representing the heart valves (tricuspid valve, mitral valve, pulmonary valve, and aortic valve).
- Glue these valve shapes inside the heart model, between the chambers and blood vessels, to demonstrate how the valves separate the chambers and control blood flow.
- Optional: Add labels and explanations:
- Use markers or pens to label the different parts of the heart (atria, ventricles, blood vessels, and valves) and include brief explanations of their functions.
- Optional: Add details:
- Use markers or pens to add details to the heart model, such as blood flow arrows or additional blood vessels.
This model provides a visual representation of the basic anatomy and structure of the human heart. It’s a fun and educational project to understand the role of the heart in the circulatory system and its importance in pumping blood throughout the body.
#heartmodel #sciencefair #craftpiller #heartmodelmaking #scienceproject #sciencemodel #diy #scienceexhibition #biologymodel #zoologymodel