In this post we write about making of fetus development model (stages) usng cardboard in easy steps
Creating a fetus development model with a uterus in the center using cardboard and color paper is an excellent way to showcase the stages of human prenatal development within the context of the mother’s womb.

Here’s a step-by-step guide to help you build your model:
Materials needed:
- Cardboard or a sturdy base material
- Color paper or craft paper in various colors (pink, blue, white, etc.)
- Scissors
- Glue or tape
- Marker pen
- Optional: labels or small pieces of paper for annotations
Instructions:
- Prepare the base:
- Take the cardboard and cut it into a circular or oval shape to act as the base for your model. This shape represents the uterus.
- Alternatively, you can create a larger rectangular or square base to depict the womb and use color paper to create the uterus within it.
- Create the uterus:
- Use pink or another color paper to cut a shape representing the uterus. It should be slightly smaller than the base and centered within it.
- Glue or tape the uterus shape onto the cardboard base.
- Draw and label the stages around the uterus:
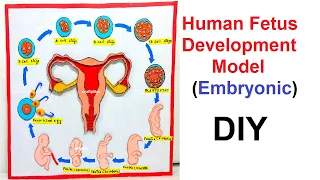
- Around the uterus, draw and label simple illustrations of each stage of fetal development. As mentioned in the previous response, here are the stages you can include:
- Fertilization, Cleavage, Blastocyst, Implantation, Embryo (Weeks 4-8), Fetus (Weeks 9-12), Fetus (Weeks 13-16), Fetus (Weeks 17-20), Fetus (Weeks 21-24), Fetus (Weeks 25-28), Fetus (Weeks 29-32), Fetus (Weeks 33-36), and Full-term Fetus.
- Around the uterus, draw and label simple illustrations of each stage of fetal development. As mentioned in the previous response, here are the stages you can include:
- Cut and glue the illustrations:
- Cut out each illustration you drew, ensuring they are sized appropriately to fit around the uterus on the base.
- Glue or tape each stage in chronological order around the uterus.
- Explanation:
- Use this model as a visual aid to explain the stages of fetal development within the context of the uterus. You can cover the key milestones and changes that occur during each stage as they progress within the womb.
- Optional decorations:
- To enhance the model’s visual appeal and highlight the connection between each stage and the uterus, you can add small arrows or lines connecting the illustrations to the uterus.
Remember to provide accurate information about each stage of development while using appropriate colors and shapes to represent the fetus’s growth. By placing the uterus at the center, you create a clear and informative representation of human prenatal development within the context of pregnancy.
#fetusdevelopment #fetusstages #embryonic #biologymodel #diy #craftpiller #zoology #zoologymodel #scienceproject #scienceexhibition #sciencemodel